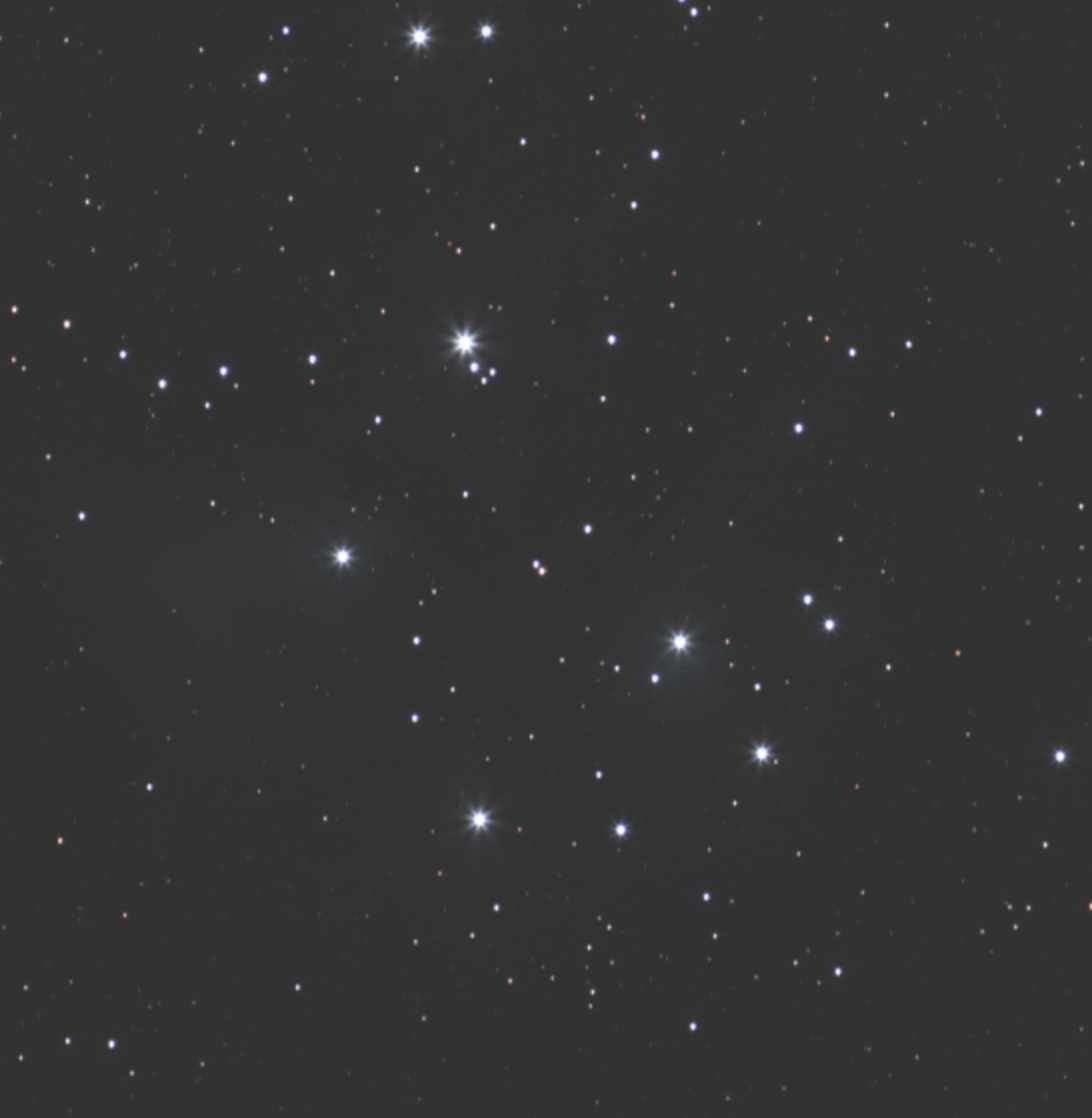
Have you ever wanted to take photos like this?
The Broke Dumbass Guide to Astrophotography
Have you ever wanted to take photos like this?
Only thought it was possible with giant desert observatories or humungous space telescopes like Hubble and James Webb? Well I’m glad to tell you that, in fact, you’re wrong! All it takes is a little bit of money, a moderate amount of travel, and a whole lot of patience. If you are someone who finds yourself staring up at the night sky often, wondering what's out there thousands or even millions of light-years away, this guide will show you how to take detailed and stunning pictures of those very things, all without a NASA budget and a graduate understanding of particle physics.
Unfortunately, you are going to need to spend money on SOME equipment, though compared to many other hobbies, astrophotography can be surprisingly affordable. If you're a photographer of any kind, you probably have a lot of this stuff already. If not, it still shouldn’t be too crazy to get good looking results. We are going to do this with a regular ol’ camera and no expensive star tracker.
Wow, who knew you needed a camera to take photos? But seriously, your phone camera isn’t gonna cut it. You’ll need a camera body with a decent sensor, interchangeable lenses, and the ability to shoot RAW images. A lot of “bad” entry-level cameras are actually perfectly fine for astrophotography, and the more expensive you go, the more diminishing the returns become. I’ve found listings for used Nikon D3300s for as cheap as 50 bucks (This is the camera I use!). The older the camera, the better the deal you'll get. The main thing to consider is sensor size. The D3300 for example has a 24 megapixel APS-C (23.5mm by 15.6mm) sensor (so 6000x4000 images, roughly speaking). The larger the sensor, the less noisy and brighter the image tends to be. The higher the sensor resolution (megapixels), the more detailed the images tend to be. The reason to care about this is that, the more detailed and clean the images you can capture, the more aggressively you can crop images in post. Look for a sensor that is APS-C, APS-H, or full-frame, and can take at least 12 megapixel images (4290 x 2800).
The lens is the most important part of your kit. You want to get as fast and as long a focal length lens as possible. What does this mean? Well, the aperture is the ring that moderates the light coming into the lens. The wider the aperture can open, the more light can come in. We call a lens with a wide aperture “fast” because it is faster at gathering the same amount of light compared to a lens with a narrower aperture. Aperture size is measured in f-ratio, or the diameter of the aperture divided by the focal length. The lower the f-ratio, the faster the lens. The focal length is the distance between the optical center of the lens and the image sensor when the lens is focused at infinity. Essentially, the longer the focal length, the narrower and more zoomed the image will be. The shorter the focal length, the wider and less zoomed the image will be.
Well okay, what does this mean practically? For the purposes of this guide, I’m going to assume you’re trying to shoot somewhat large but faint deep-sky objects, like galaxies, nebulae, and star clusters. For this purpose, try to get a focal length of 135mm or higher, and an f-ratio of f3.5 or lower. I personally use a Nikkor 80-200mm f2.8 lens, but I only ever use it zoomed in at 200. Personally, I wouldn’t worry about zoom or autofocus. You’re going to want to be as zoomed in as possible and turn autofocus off. My lens is $180 used, but I’ve found 135mm f2.8 lenses for as low as $50 used. Just make sure the condition is good and the lens fits the mount on your camera (or you have the proper adapter to make it fit). If you want to take a picture of the Milky Way, you'll need a lens with a short focal length (wide-angle), like 20mm. For REALLY small objects, like planets or distant galaxies/nebulae, you'll either need a huge lens, or you'll need a telescope with a star tracker. That is quite expensive and a whole can of worms, and therefore beyond the scope of this guide.
This really doesn’t need to be anything fancy or expensive. Just make sure it can tilt straight up and down, doesn’t fall over, and has a standard screw mount.
You can get these used for pretty cheap, and there isn’t a whole lot of variability between them. The intervalometer is basically a remote you connect to your camera that can tell it to take a sequence of timed images. Make sure it’s compatible with your camera, but otherwise they are all the same.
These are very cheap. Get a 128GB capacity card or higher, you’ll thank me
Although the screen on your camera will probably blow out your night vision to some degree, you want to preserve whatever semblance of dark-adjusted eyes you have left to help navigate the night sky. One of these to help you see your equipment in the dark lets you do just that. Keep it dim, just enough to see what you’re doing.
Great, you’ve blown out your 200 bucks of grocery cash on niche hobby gear and now you want to get out and use it. Well, if you want a good result, you’ll need to get out at the right place and time. There are a few factors to consider:
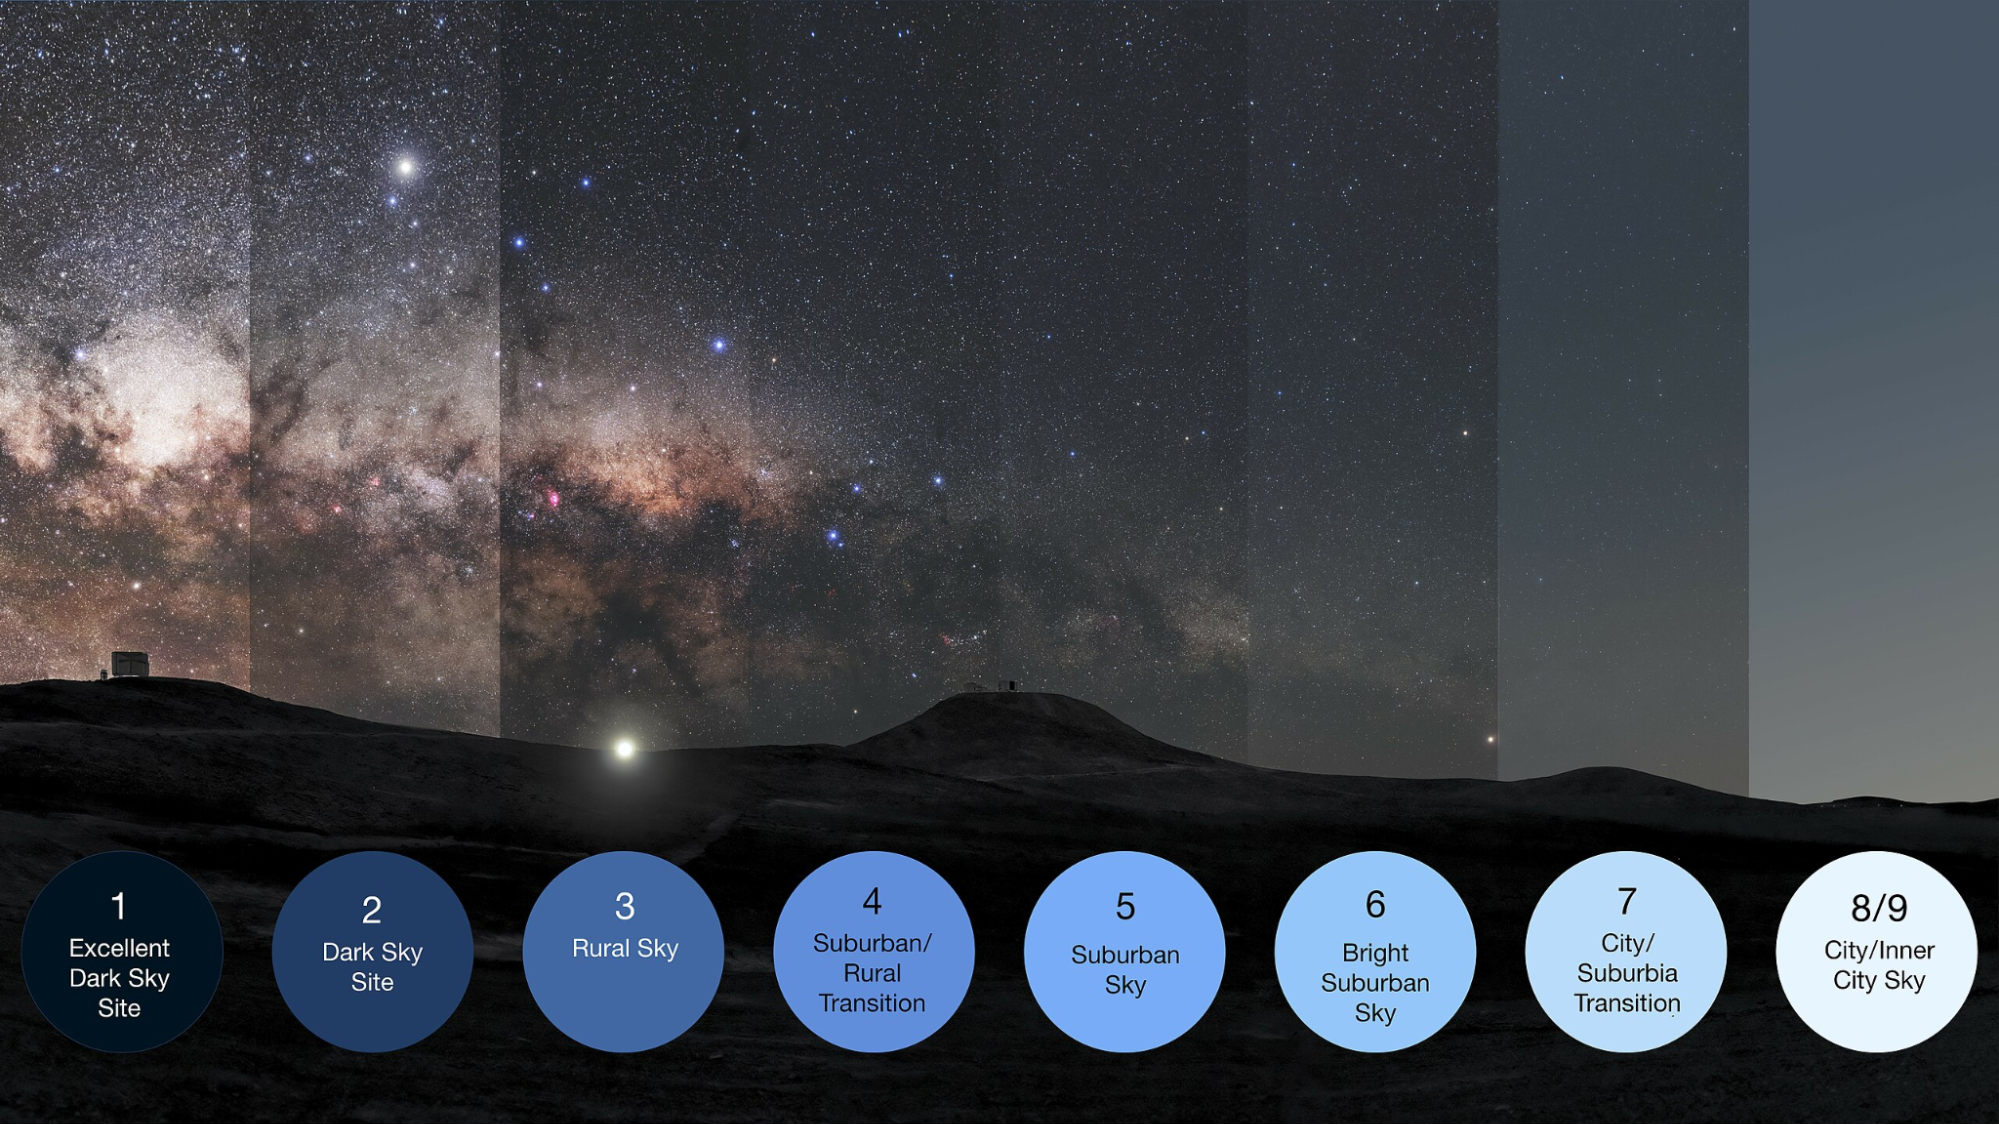
This is the big one, and probably the first thing people think of when considering anything astronomy related. The darker the skies, the better the shots. Light pollution is usually measured in the nine level Bortle Scale, with 9 being extremely bright light polluted urban skies, and 1 being remote pristine dark skies.
Light pollution and Bortle levels can easily be measured with an online light pollution map, such as that on https://www.lightpollutionmap.info/. The further you’re willing to drive to darker skies, the better your results. Try to get out to Bortle 4 at the minimum, but lower is better of course.
Astronomical seeing is essentially a measure of how steady the atmosphere is. You want to find an area with minimal atmospheric interference to help get crystal clear images. A great way to do this is to find somewhere with high elevation, like a plateau or mountain. Essentially, the higher up you are, the less atmosphere the light from your target has to go through to get to your camera sensor. Another way to do this is to find somewhere dry, especially deserts. Deserts have low humidity and thus low atmospheric interference, with the added plus of very little to no clouds to get between you and your target. Yet another way to do this is to get on the open ocean, or a small island in the ocean. The ocean forms a stable boundary layer with the atmosphere that leads to very little turbulence. It is for these reasons that some of the most prized astronomy locations are places like Mauna Kea, the Atacama Desert, and the Canary Islands. Because of its low light pollution, high elevation, and arid cloudless climate, Capulin Volcano in New Mexico is a personal favorite location of mine. Plus, it’s gorgeous during the daytime too!
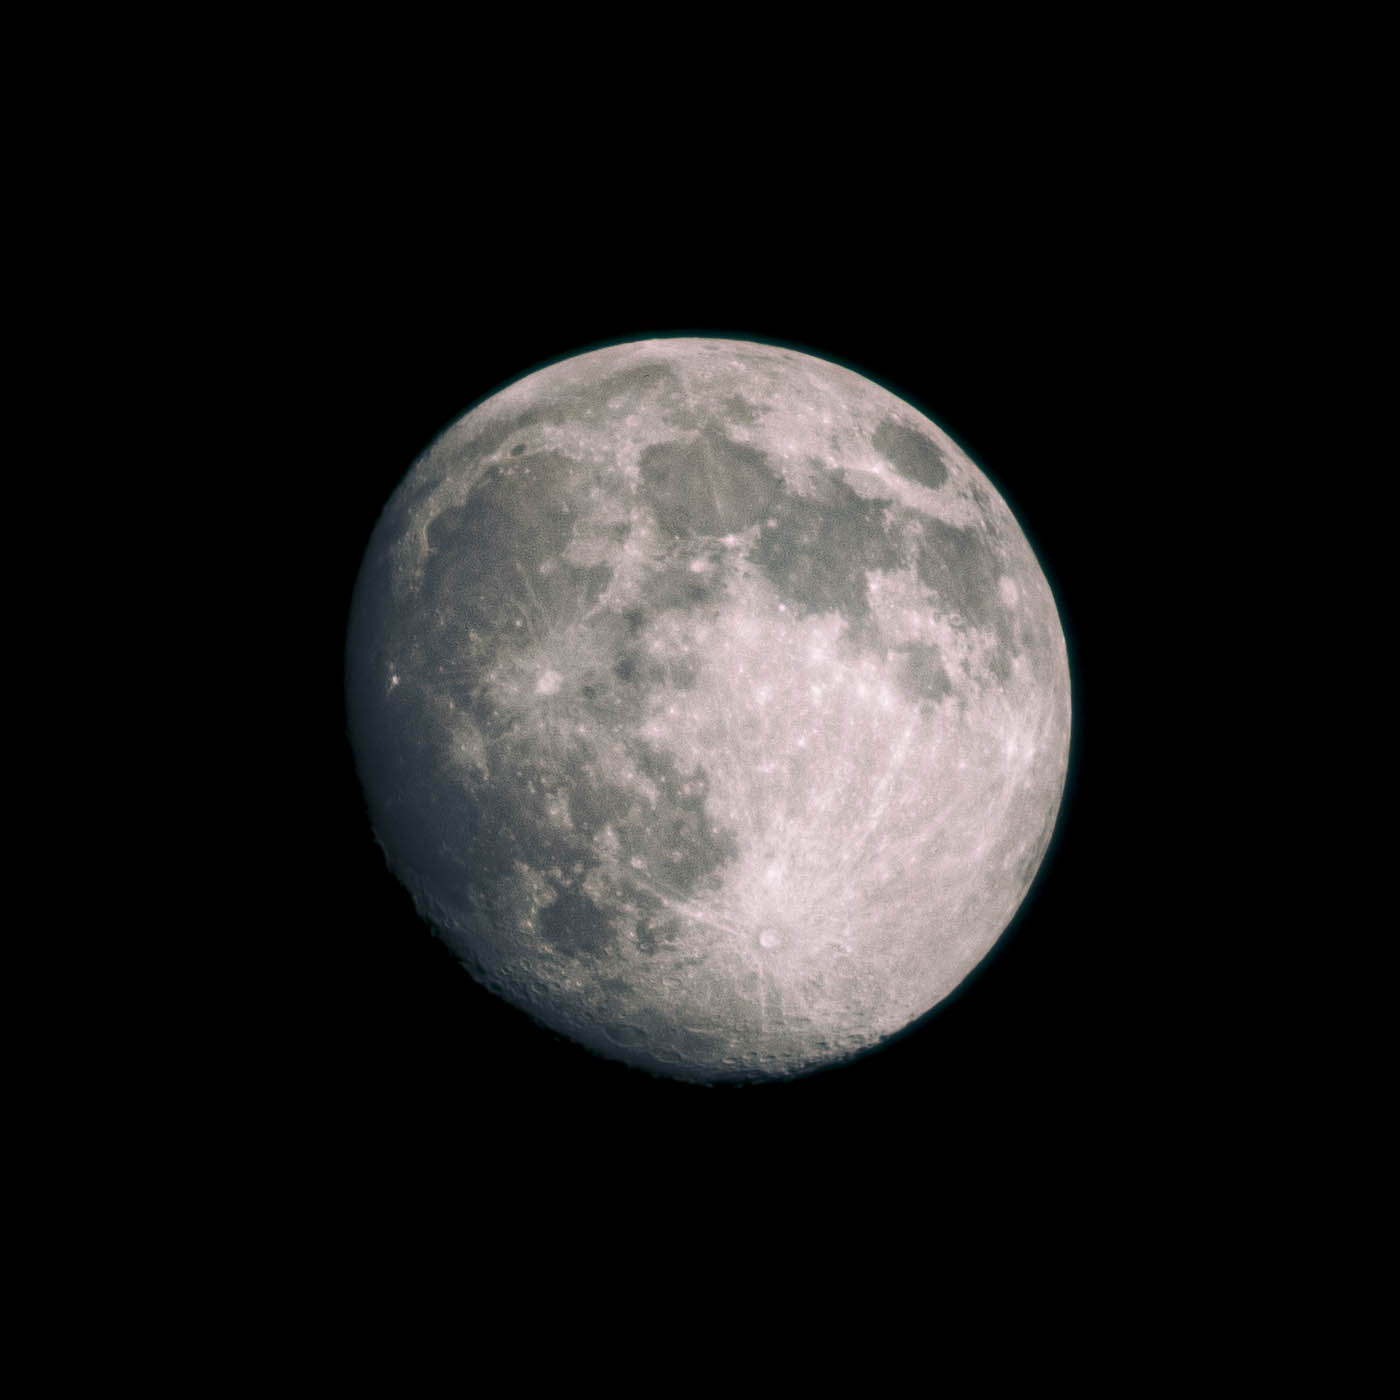
This is essentially just another source of light pollution, just not manmade. The moon is ridiculously bright compared to everything else in the night sky, bright enough to cast sharp shadows in the middle of the night. For this reason, the best time for an astrophotography outing is the new moon, because it will be below the horizon, with the sun. If you can’t get out on the new moon for whatever reason, a crescent 1 or 2 days before or after is still pretty good. Essentially, find a time to shoot when the moon is below the horizon.
That is, of course, unless you want to take pictures of the moon, which you can most certainly do.
Kind of obvious, but make sure you check the weather wherever you’re going! Clear and dry is a must.
Any season will suffice, but winter is especially nice because of the longer night, and thus longer and more comfortable shooting time. Your sweet-spot dark window will start 1.5 hours after sunset and end 1.5 hours before sunrise due to astronomical twilight. Obviously, the season will mostly be up to when your target is in the sky.
If you can line up as many favorable conditions as possible, you’re in for a good shoot.
So you’ve found a time and a place. Depending on where you live, how motivated you are, and what time you have free, an astrophotography venture can be anything from a brisk 30 minute drive for some relaxing evening shooting, to a 16 hour round trip in the brutally cold desert winter night, sleeping in the poorly insulated car to wake up at 3am because that is the only window you could catch where the moon is below the horizon (trust me, I would know.) No matter how involved the adventure is, you're gonna want to pack and prepare well. You should be bringing more than just your equipment:
Chances are, it may be very cold wherever you are going. Layers are key: long underwear/thermal layer, a nice warm shirt and pants, a warm insulating winter jacket, gloves, hat, scarf. Don’t freeze!
If you’re out there for a long time, especially in a desert, you’ll need plenty of water. Don’t skimp out, buy a gallon or two. Better to have some extra water on your hands than be miles from civilization with none. Only after you have some water can you bring other beverages of your choice along, tea, coffee, soda, energy drinks. But make sure you have water first and foremost. Taking exposures for hours in the middle of the night also has a tendency to make one hungry, so bring grub. Nuts, dried berries, and jerky are classic non-perishable options. Don’t starve and don’t dehydrate.
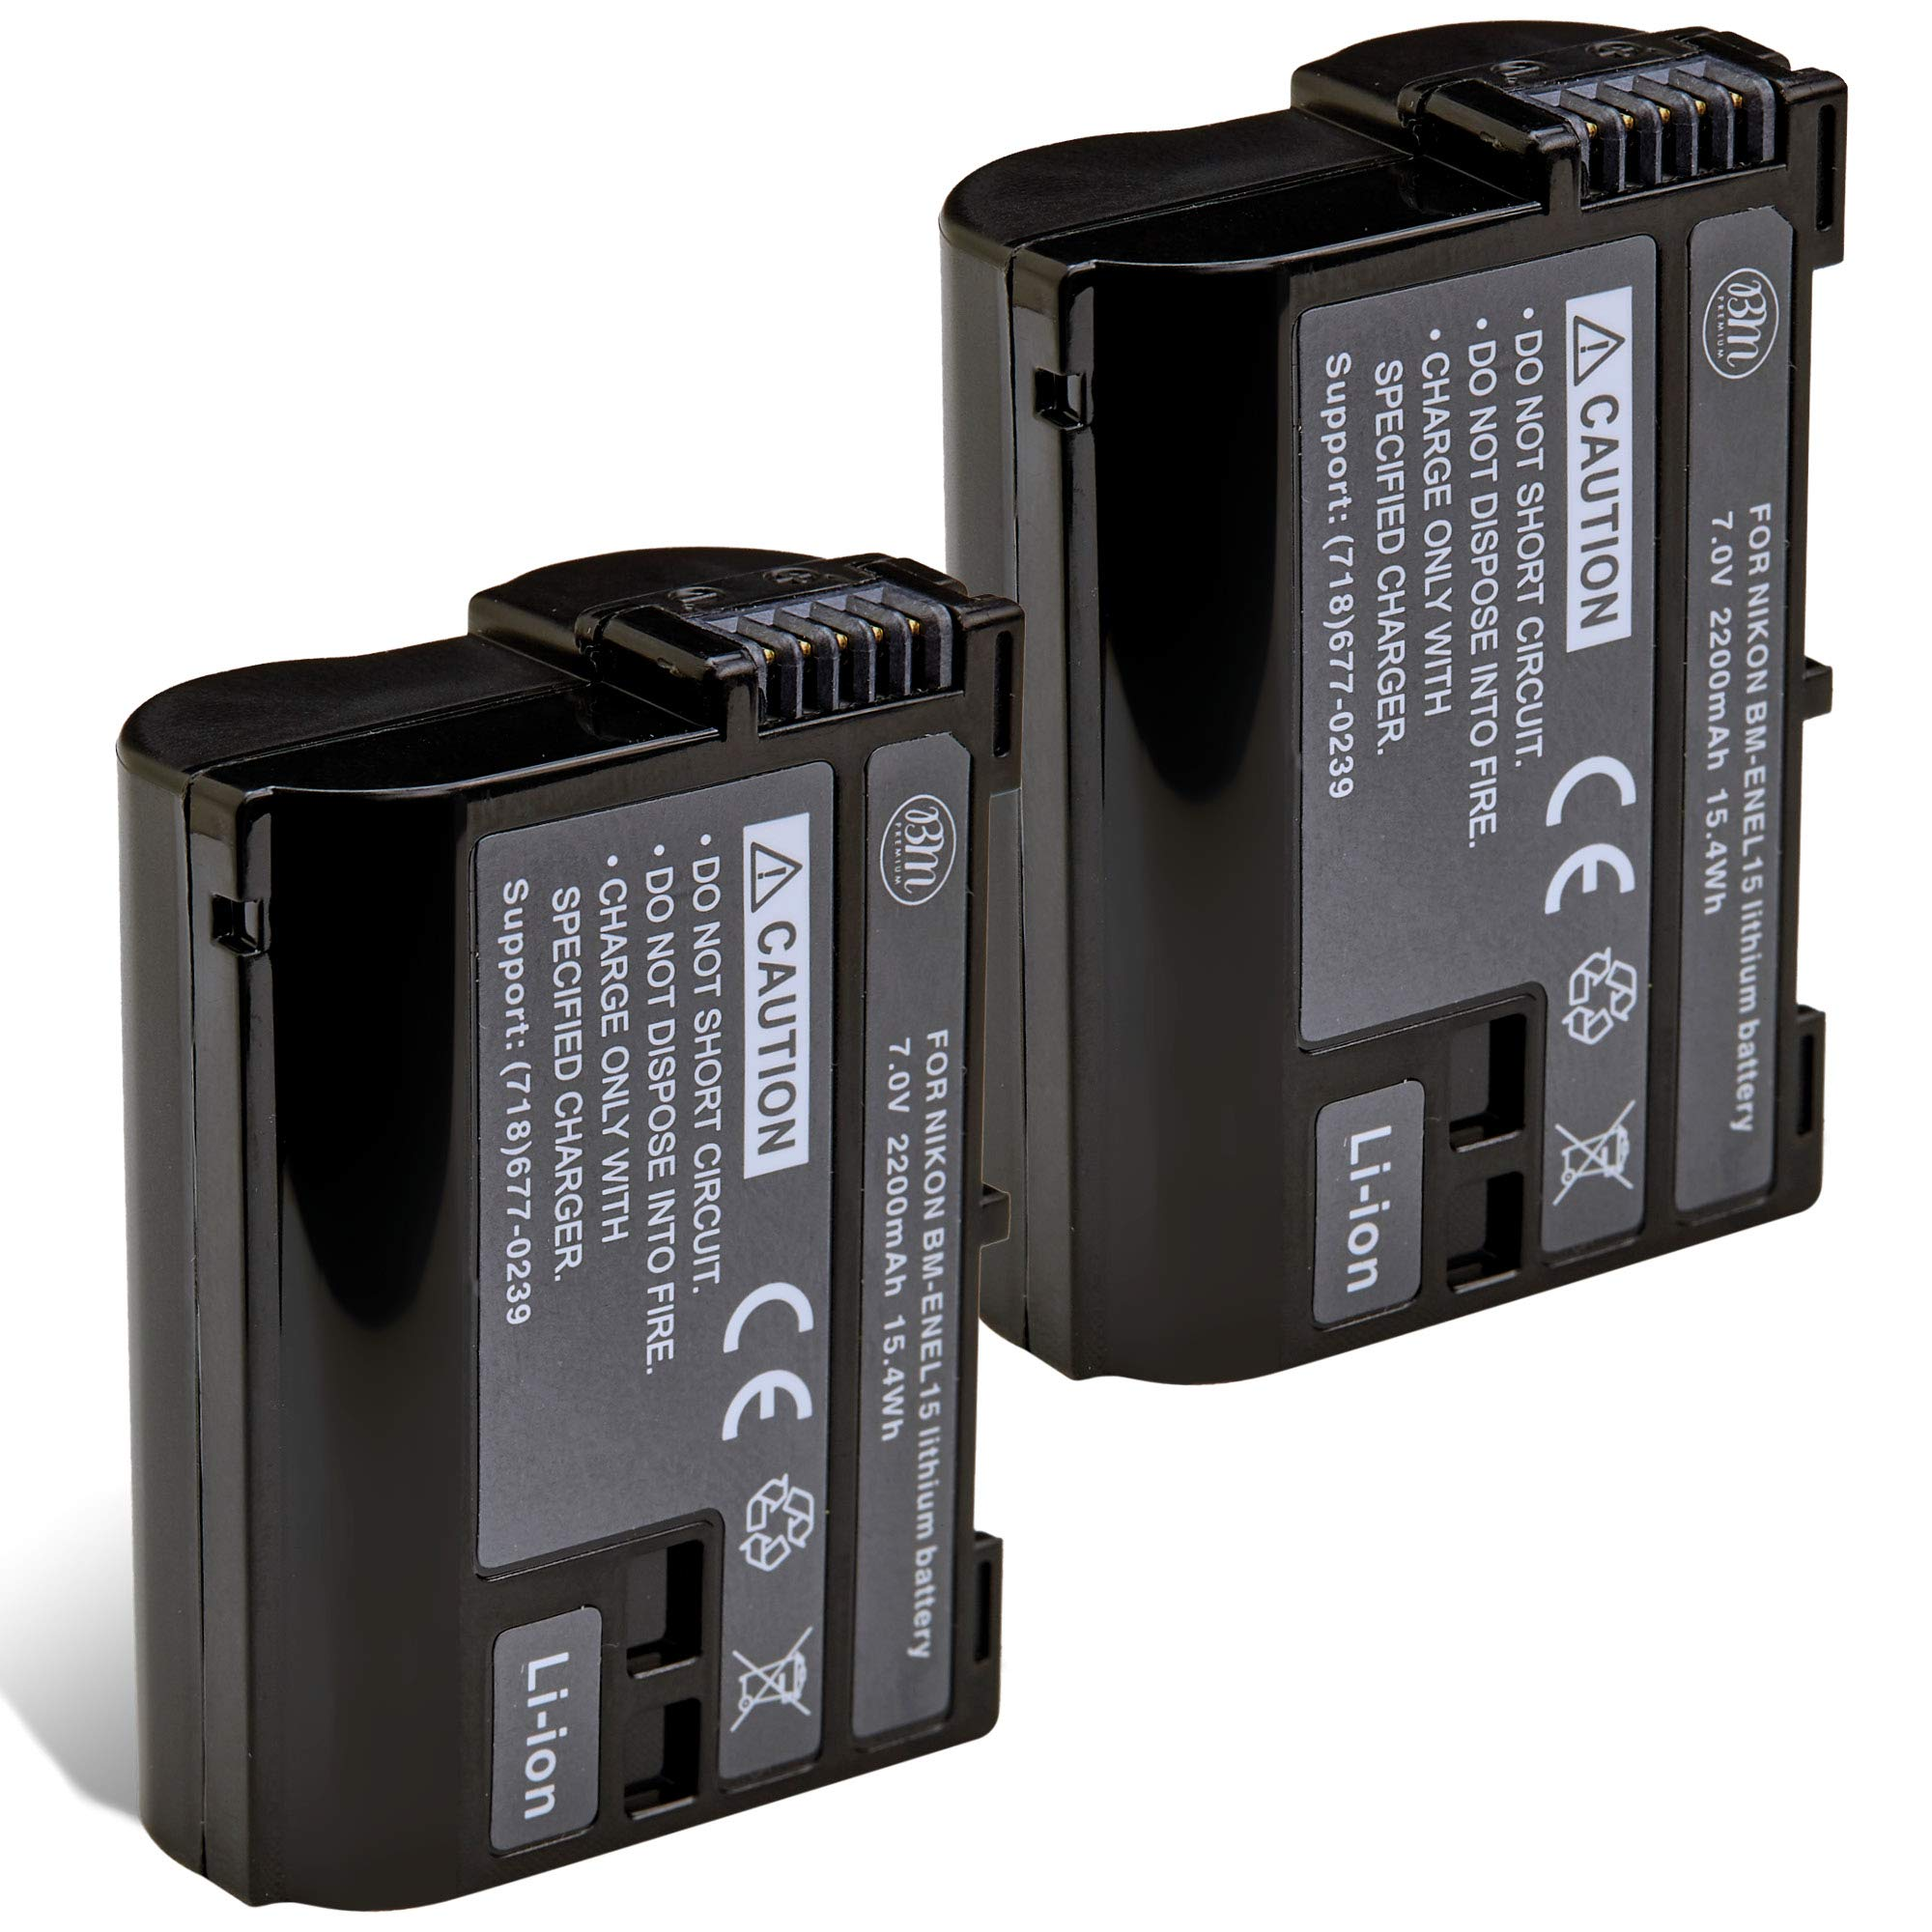
Bring a LOT of spare camera batteries. I currently have three, and honestly I should probably buy two more. Especially in the cold, where batteries drain faster, you don’t want to have your perfect shoot cut off early because you ran out of battery. Grab four or five, don’t be shy. Bringing your battery charger and a portable power source is a good idea too.
Not strictly necessary, but especially with many of the remote locations ideal for astrophotography, having a spare gas can in your trunk may save you some worry.
Another one you may or may not need, but some targets will rise and set at weird times of night. If you’re gonna be up at 3:30 in the morning to shoot the Sombrero Galaxy or whatever the hell, you’re probably going to want to catch some Zs beforehand. Bring a comforter and pillow to keep you warm and cozy as you sleep in your car.
This may seem weird and random… but trust me, you’ll need it.
Look, there’s always going to be someone out there who has more money, time, expertise, and/or dark skies than you. It’s easy to go look at astrophotography forums and feel overwhelmed by the stunningly gorgeous images taken by astrophotographers the world over. But if you can resolve even a single pixel of light that took millions of years to reach your camera? That’s already cool as fuck in my book.
You bring these with you? You’re in for one hell of a ride.
So you’ve got your equipment, warm clothes, plenty of snacks and batteries, and an extra gallon of water and gasoline just in case. Now what? What should you shoot? For your first few shoots, I recommend large, bright, easy, and rewarding targets.
Our closest galactic neighbor is my biggest recommendation. It’s huge, even bigger in the sky than the moon, albeit much much fainter, which is why only the bright galactic core is visible as a faint smudge in very dark skies. Visible year-round in the northern hemisphere, and especially prominent during autumn and early winter. Much more difficult to capture in the southern hemisphere, but technically possible low on the northern horizon during the late southern spring and early southern summer (October-December). Even short integrations will be bright, detailed, and beautiful, showing the orbiting dwarf galaxies M110 and M32 as well.
A very bright nebula and stellar nursery in the constellation Orion and another I highly recommend. Its apparent size is also very large and easily shows up on long exposures. Visible from late northern fall to mid-spring in both hemispheres (late southern spring to mid-fall). Short integrations will look good already, and longer integration time will bring out even more detail of colorful ionized gas and delicate hydrogen filaments.
A bright star cluster in the constellation Taurus that is easily visible with the naked eye in even slightly dark skies. Visible October-April, but especially high November-January in both hemispheres. The stars themselves are easily resolved, and with longer integration times, the faint blue nebulosity around the stars is revealed, caused by the stars’ light passing through a cloud of interstellar dust.
Dwarf galaxies that orbit our Milky Way. The Large Magellanic Cloud in particular is very bright and large. Sorry to the 90% of people who live in the northern hemisphere, these jewels are exclusive to the southern sky only. The further south you are, the more readily visible they will be, but best seen in southern spring and summer (September-February). Spiral structure of the LMC is already sort of visible with the naked eye, and astrophotos resolve magnificent detailed structure.
The second closest galaxy to our Milky Way behind Andromeda, it is also decently bright, albeit fainter than Andromeda. It is easily visible from fall to later winter, especially October-December in the northern hemisphere. It’s pretty high in the northern sky, and therefore not really possible to capture meaningfully in the southern hemisphere. Nearly invisible to the naked eye except in exceptionally dark skies, but easily revealed with stacked exposures.
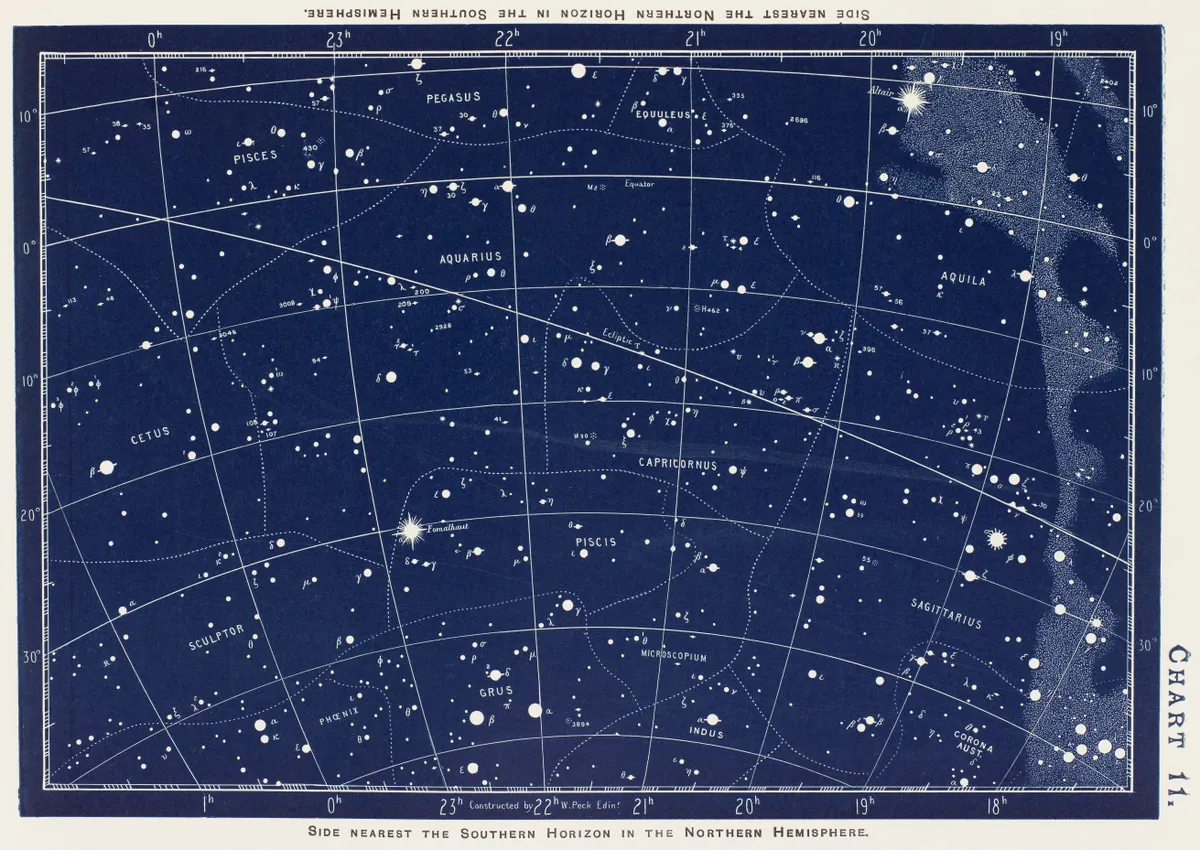
To actually find your targets on-site, use a star chart app such as Sky Guide for iOS or Stellarium Mobile for Android, or you can use paper star charts like the ancient cadaver you are, unc. Just remember, if using an app, turn down your phone’s brightness and use a red filter if you can. In addition to star charts, you should just get a sense of what's in the sky where and when as you go out. Familiarize yourself with the brightest stars and constellations, as they can be useful reference points when finding faint objects.
Well great, you’ve chosen a target and completed an hours-long journey to the right location at the right time of year. What now?
Turn your camera's aperture, shutter speed, and ISO up in live view as high as they can go so you can see what you are doing. Choose a very bright object in the night sky, like Jupiter, Sirius, Canopus, Betelgeuse or Alpha Centauri. Most likely, it will be a blurry large circle. Pull the focus ring until the object is focused to the smallest possible point. A Bahtinov Mask can make this easier, but this guide assumes minimal equipment, and with a good eye it can be done without.
Open your aperture as wide as possible to let as much light in as you can. Set your ISO to 1600 for the actual images themselves (but have it as high as possible when aiming). Your shutter speed is going to depend on the focal length of your lens. Essentially, you’re going to want to get as long of an exposure as possible, but if you go for too long, the stars in the sky will create a noticeable trailing due to the rotation of the earth. Here’s a table that relates the focal length of your lens to the length of exposure you can get away with:
Focal Length | Shutter Speed |
24mm | 15s |
35mm | 12s |
50mm | 8s |
85mm | 5s |
100mm | 4s |
135mm | 3s |
200mm | 2s |
300mm | 1.5s |
400mm | 1s |
600mm | 0.5s |
Make sure any sort of autofocus is off and your camera is shooting in RAW and not JPEG.
As for the intervalometer, it usually has 5 settings. The first one is a self-timer that will dictate how long before the series of images begins. I usually set it to 5 seconds, which gives ample time to glance that it's working, set it down, and walk away, allowing the camera to remain perfectly still and stable. The second setting is how long each of the exposures are. For whatever reason, this sometimes needs to be set to double the actual shutter speed for some cameras (like my D3300) due to how bulb timing is handled. The third is the interval time, or time between exposures. 1 second is usually just fine to let your camera adjust for the next frame. The fourth is the number of exposures. I would go around 100 frames at a time before reframing, to make sure your subject doesn't drift out of frame. The fifth is whether the intervalometer should beep when it’s finished, which I usually like to keep on.
When aiming, consult your star chart to find the approximate position of the object in the sky, using stars, constellations, and asterisms to position yourself relatively. Your object may not be visible to the naked eye or camera live view, so take a test exposure of 4-10 seconds to see if your object shows up as even a very faint smudge. If it does, you’re golden.
Have you pulled perfect focus and carefully aimed to center your target in frame? Great! Now put the lens cap back on. What, you thought we were going to start actually taking pictures of the target? Oh you sweet summer child. The beginning of any respectable astrophotography session begins with taking calibration frames! There are two kinds of calibration frame we are going to worry ourselves with: darks and flats. There’s also technically a third kind called bias frames, but on digital cameras like DSLRs in particular, electronic bias is effectively contained in dark frames. Light frames are just the frames of the target itself. But what the hell are darks and flats?
Darks are the reason you just put your lens cap back on. They are, as the name may suggest, completely dark frames that are there to combat thermal and electronic noise in your camera, resulting in a less noisy final image after calibration. Dark frames are extremely sensitive to temperature (even a few degrees fluctuation can ruin darks), and it is very important that the temperature of your camera match the temperature of the surrounding environment (thermal equilibrium). I recommend giving it an hour at least outside. If you set up as the sun is setting, your camera should be nicely down to temp by the time astronomical twilight is over. Once you are reasonably sure your camera has reached thermal equilibrium, go ahead and adjust your camera settings to match the shutter speed, ISO, and aperture of your lights (the images you are going to take of your actual target) Take 50 of them.
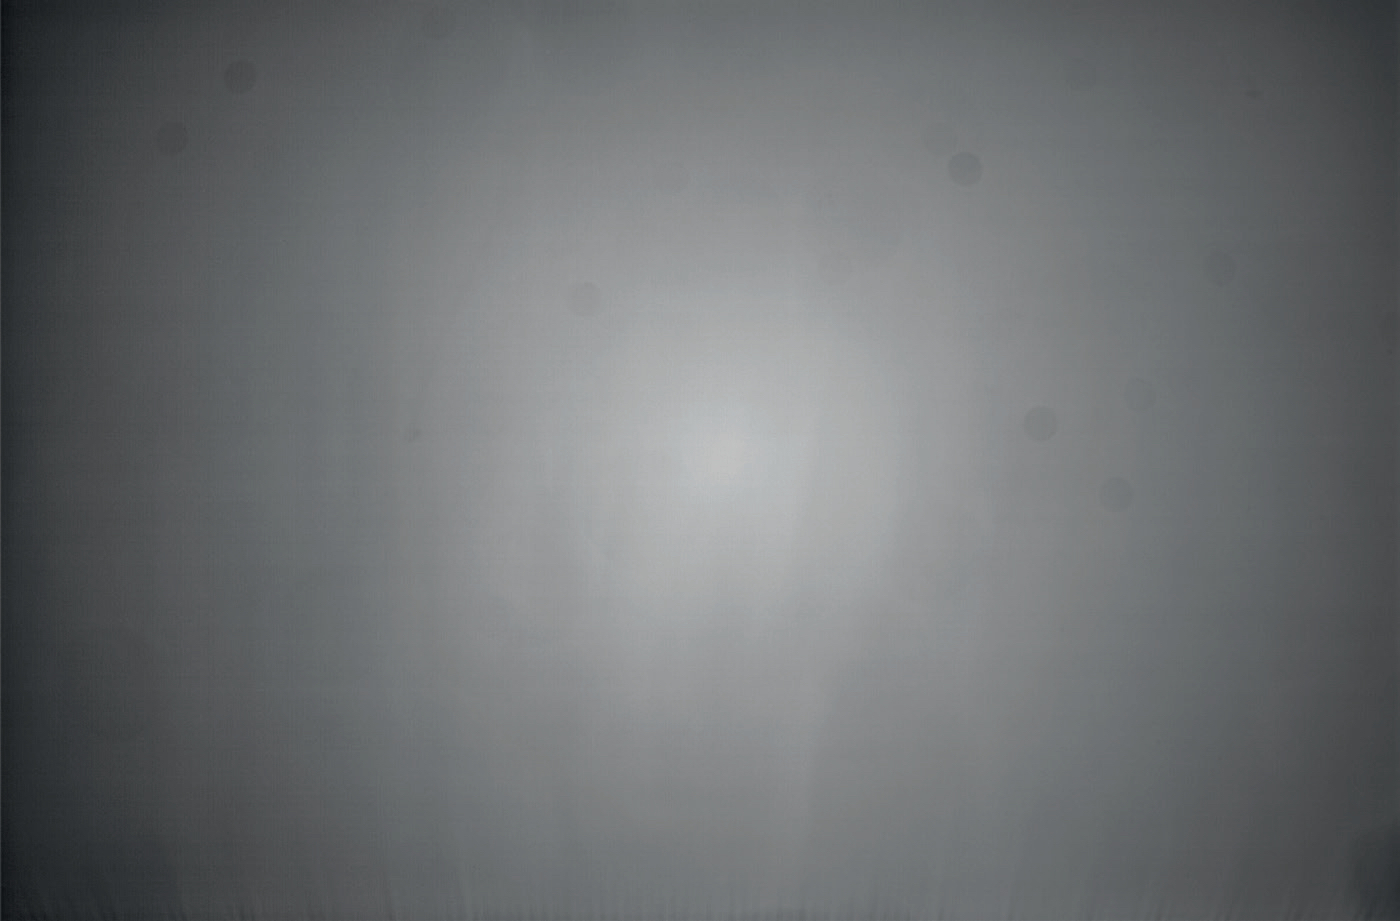
Flats are what we needed that white t-shirt for. They are uniformly lit grey frames there to combat things like vignetting and dust spots. To take them, wrap the white t-shirt around your camera lens and pull it taught. Then use a tablet, phone, or computer set to a blank white screen (or really anything that can emit a uniform diffuse white light) and aim it at the lens so that it goes through the t-shirt. DO NOT MOVE THE FOCUS RING OR ZOOM BETWEEN FLATS AND LIGHTS. Take a test frame before you actually go and take all of your flats, and make sure it doesn’t clip (isn’t white and blown out). A good flat frame should be grey with a noticeable vignette.
Just like the previous, take 50 of these.
Ok, it’s finally time to take the damn pictures. And now that you’ve pulled focus, dialed in your settings, aimed, and taken your calibration frames, it should be pretty easy! Just reframe to account for any drifting of the target that occurred while you took your calibration frames. Now, get out of live view and reset your ISO to 1600 and your shutter speed to whatever you took your calibration frames at, set your intervalometer to 100 frames, and hit start!
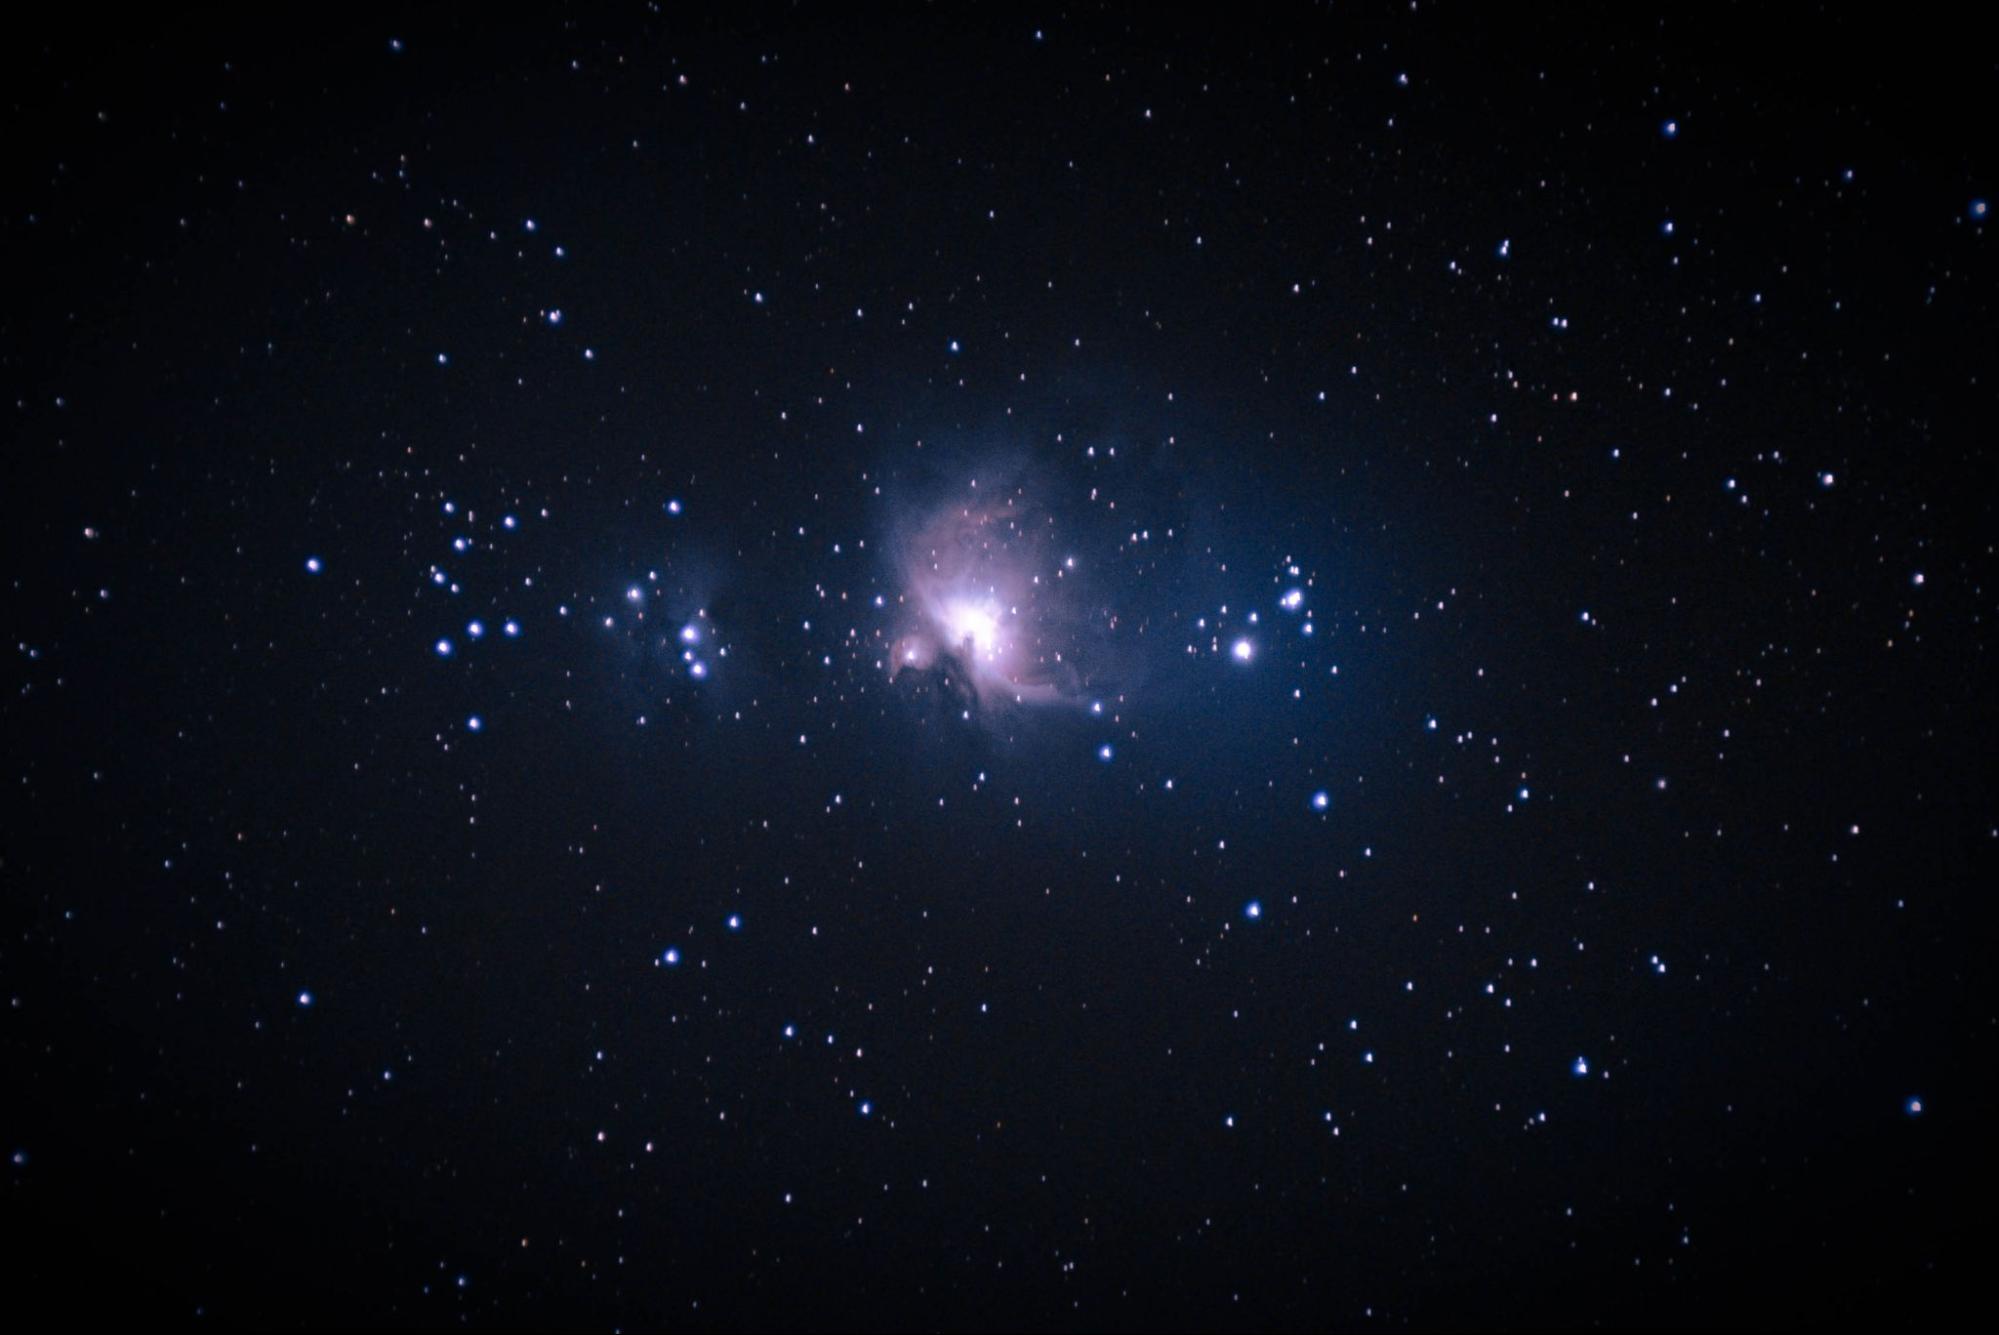
As stated before, shooting sequences of 100 frames is your best bet before your target drifts too far out of frame. How many frames you should take in total kind of depends on your target, but generally the answer is as many as you can. Here’s one of the very first astrophotos I took:
This image of the Orion nebula used just 180 2-second subexposures (light frames) on a 135mm f2 lens. After heavy processing, I think it turned about pretty well for a first shot! But we can do better. Here’s a revised photo I took later:
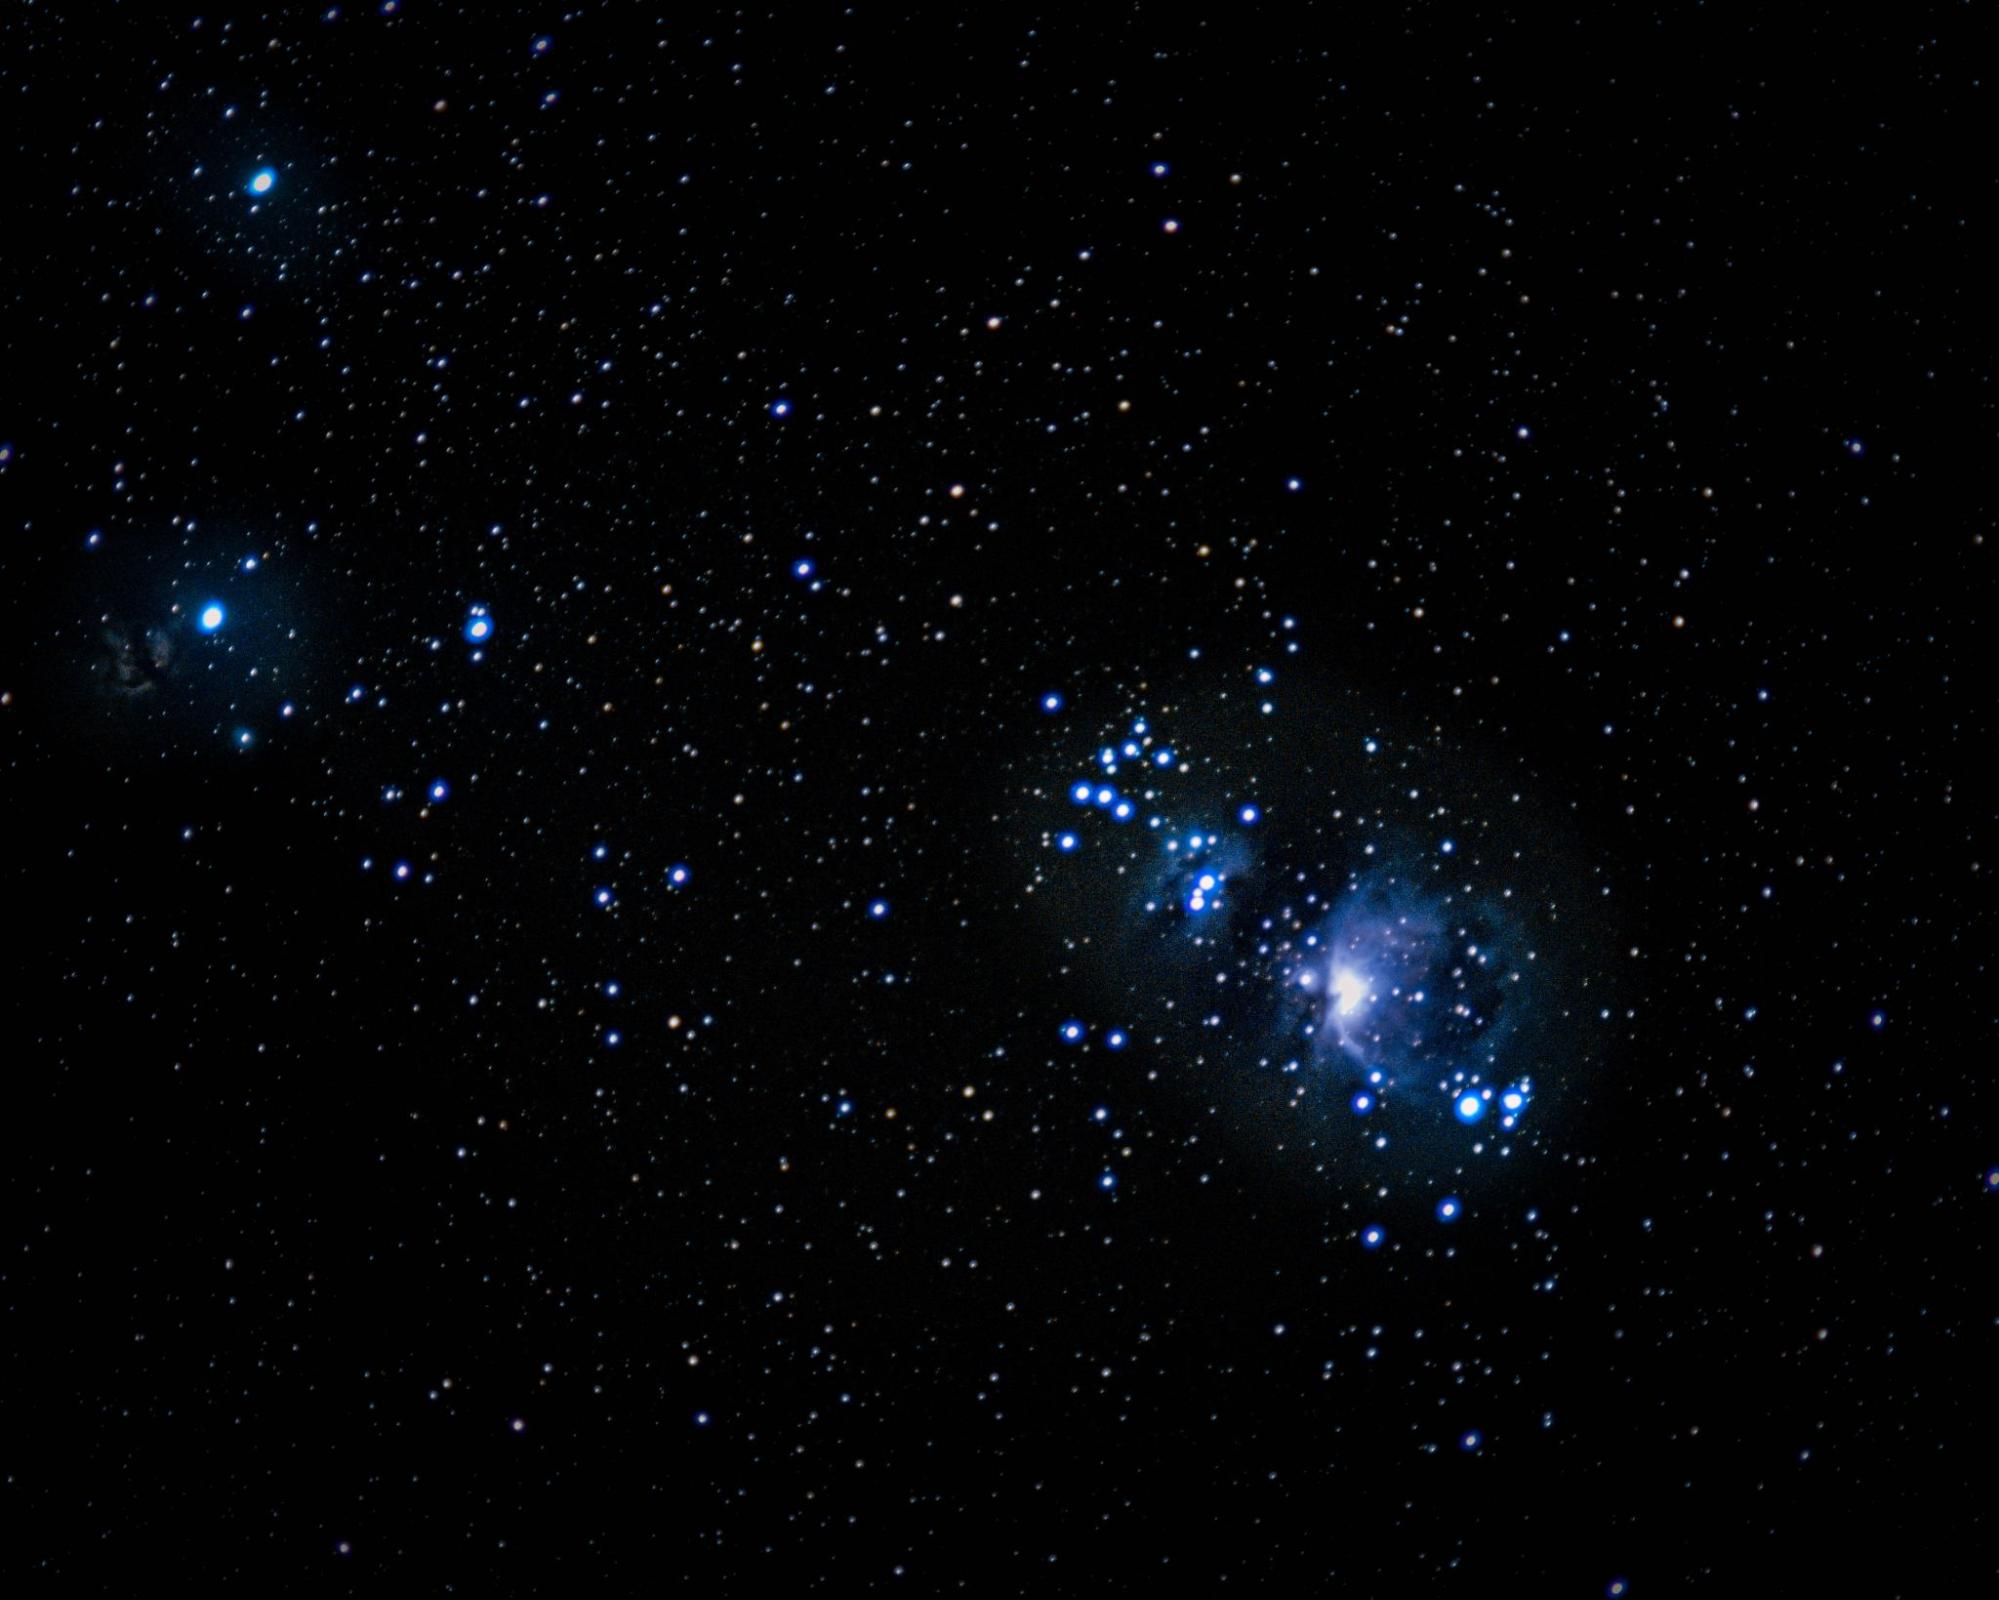
This image used 300 2-second subexposures and was taken with my 200mm f2.8 lens. Obviously, the longer focal length makes the target larger and more detailed. But more importantly, despite the lower f-ratio, the larger amount of subexposures was able to bring out more of the faint detail of the nebula without blowing out its bright core. Honestly, I could probably get much better results with even more subexposures. The total exposure time, so the number of subs multiplied by the shutter speed, is called the integration time. The first image had an integration time of only 6 minutes, whereas the second image had an integration time of 10 minutes. The longer the integration time, the more faint and intricate detail you can bring out in processing later. Don’t worry if the target doesn’t show up very bright or even at all in your subexposures.
Let's say you've set your intervalometer to 4 seconds with 1 second intervals (to take 2 second exposures). That means for each 100 subs, you're waiting 500 seconds, or about 8 and half minutes. And if you want to take an image with 600 subs total? You're looking at almost an hour of just the camera taking images automatically, with intermittent reframing. So get comfortable! Kick back and relax with some snacks, and appreciate the beautiful night sky stretching all around you.
So now you’ve got a card full of images and you’re back home out of the freezing cold. How do you turn your series of seemingly black photos into a beautiful image?
You’re going to install an open-source program called Siril, available for Mac, Windows, and Linux. There are other free astrophotography editors out there, but Siril is the one I learned, so it’s the one you’re going to learn.
Before you even open Siril, you’re going to want to make sure you have a LOT of disk space. Like, take the number of GB used up on your SD card, and then multiply that by 10. That’s a conservative estimate of how much disk space you’ll need free. You can make it less bad with hierarchical stacking, but astrophotography is a son of a bitch when it comes to hogging disk space. Siril converts your losslessly compressed RAW images to totally uncompressed FITS images, which can be ten times the size often, plus creating redundant sequences as you go through things like calibration and registration.
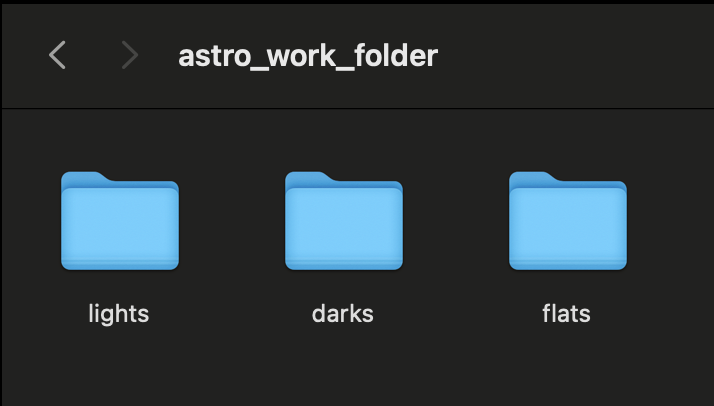
So now with 100GB free for a 10GB shoot, go ahead and create a working folder somewhere on your disk you can easily access. Create three subfolders within that folder for lights, darks, and flats. Here’s an example on the home directory of my Mac:
Once you’ve done that, go ahead and drag the RAW images from the SD card to each of these folders. Now open up Siril and click the little blue home icon in the top corner.
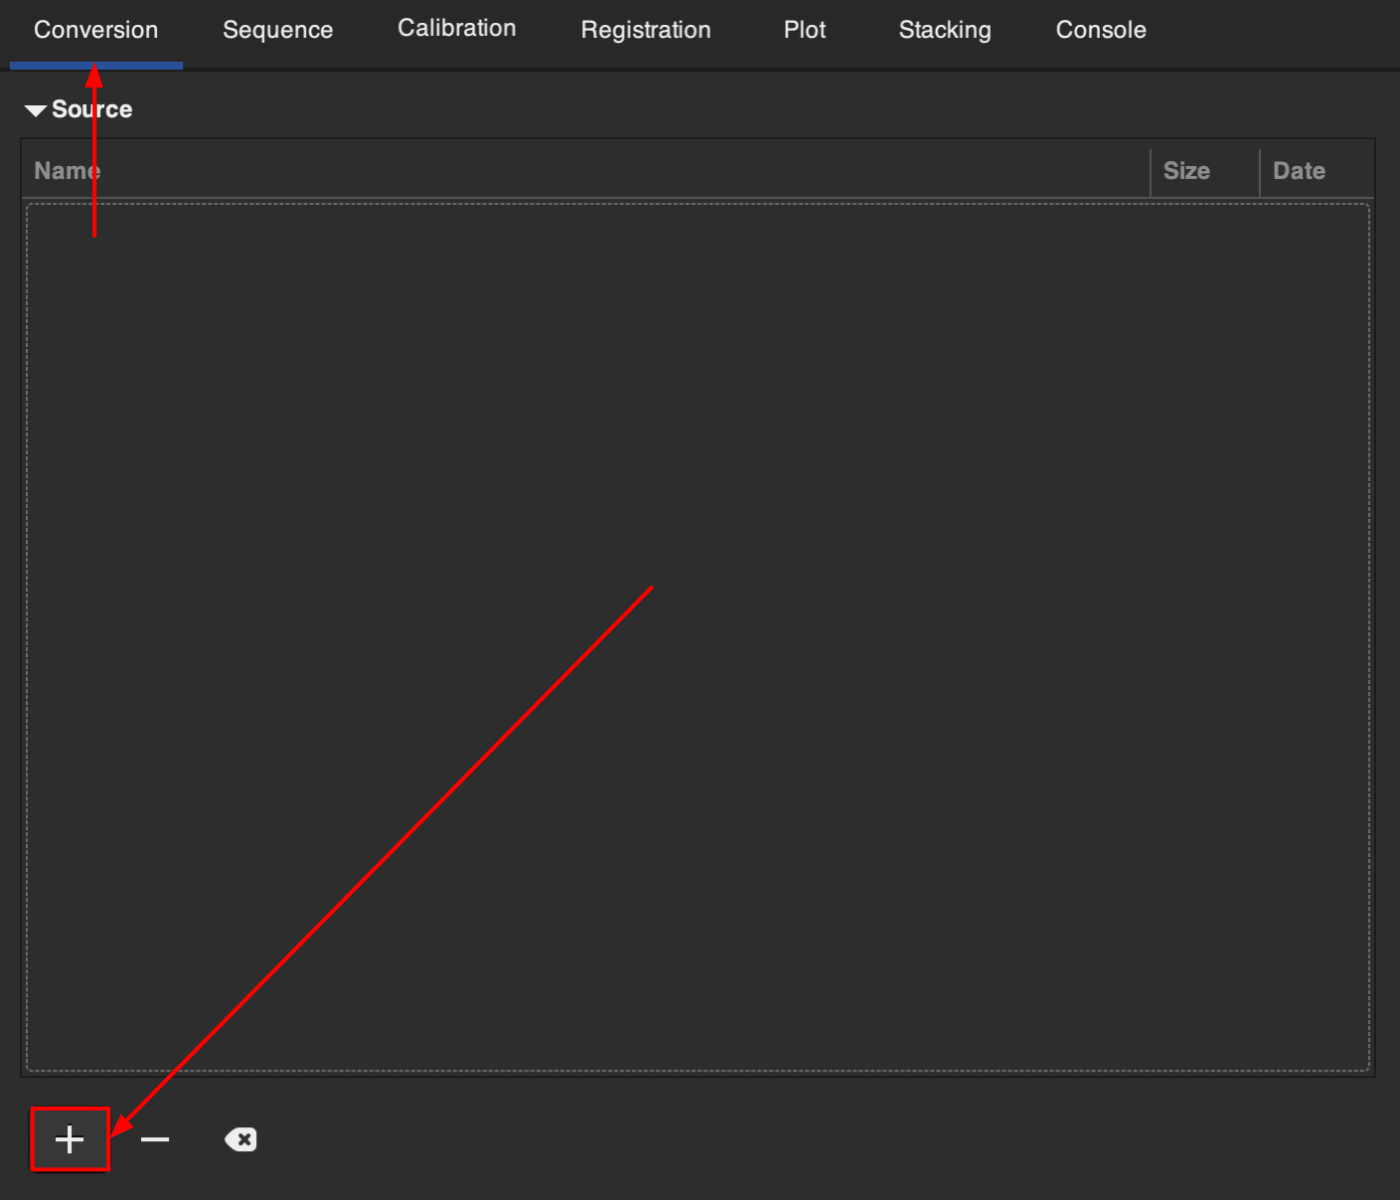
This is going to prompt you to select a folder. Navigate to your working folder and hit “OPEN”. In the console you should get a message something like “Setting CWD (Current Working Directory) to ‘(filepath)/astro_work_folder’”. Now, in Siril, navigate to the “Conversion” tab and click the plus icon.
You will then be prompted to add files. Navigate to your darks folder, shift-select all of your darks (which should be .NEF, .CR3, .ARW, .DNG, or another RAW format), and click “Add.” You should now see all files in that grey “Source” box. Now, where it prompts you to input the sequence name, just put in “darks”, no need to overcomplicate things. Make sure it is set to FITS images, Symbolic Link is on, and Debayer is off.
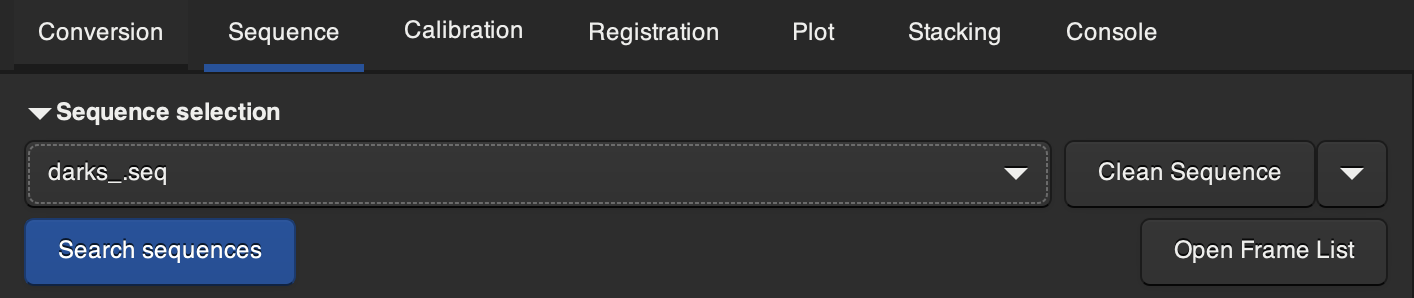
When you’re sure about the settings, hit “Convert”. Your RAW images should now be converted to a sequence of FITS images. To confirm this, you can navigate to the “Sequence” tab and you should be able to see darks_.seq in the “Sequence Selection” dropdown.
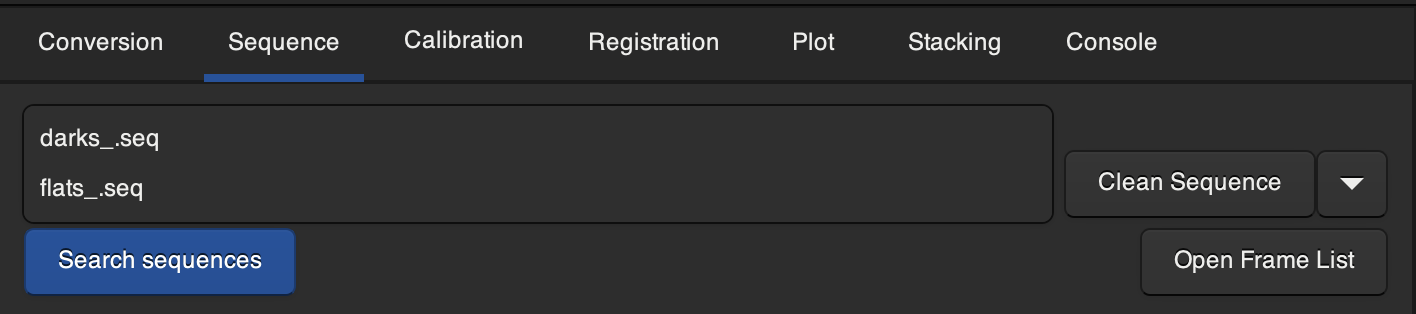
Now, navigate back to the conversion tab, and do the same with your flats. Make sure you remember to change the sequence name to “flats” instead of “darks” or you will end up overwriting your darks sequence and having to start over. Hold off on converting your lights for now, we will deal with those later. You should be left with darks_.seq and flats_.seq in the “Sequence Selection dropdown” now.
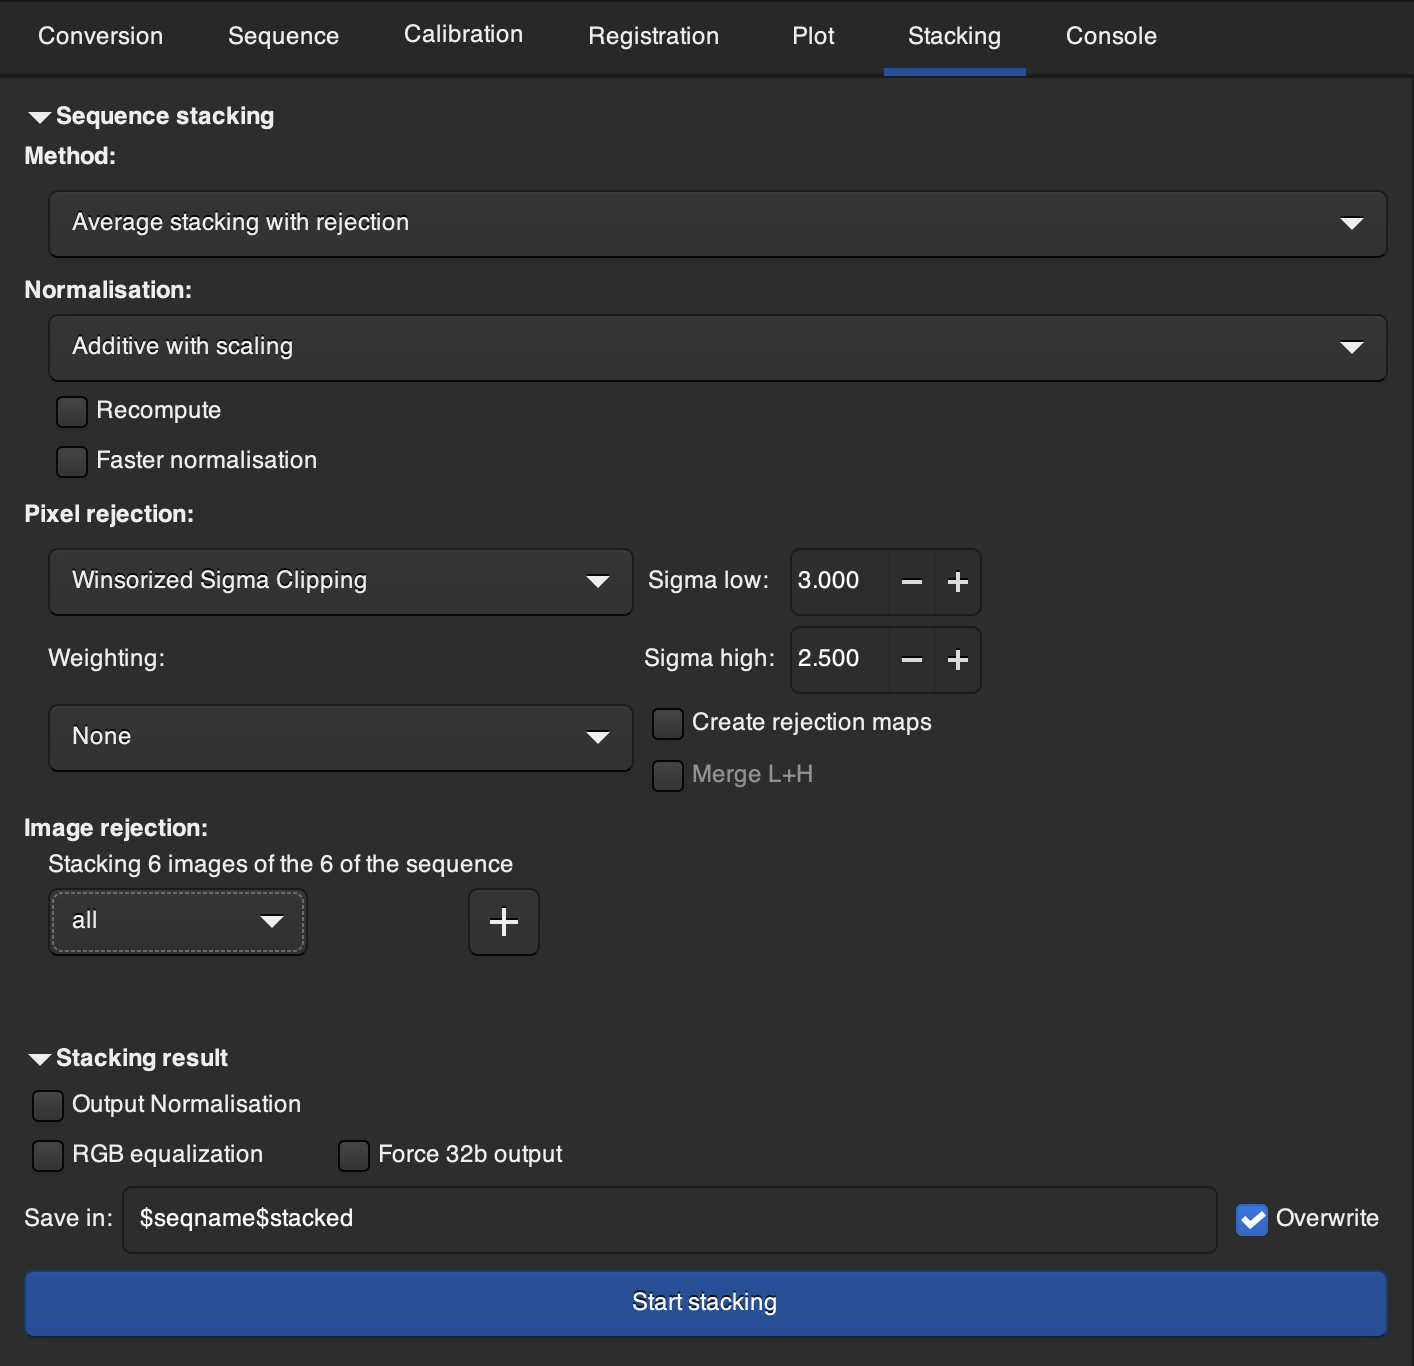
Now, we are going to stack the calibration frames to create master images that we will use to calibrate our lights later. To do this, go to the “Sequence” tab and select darks_.seq in the dropdown. Now, navigate to the “Stacking” tab. Under “Sequence Stacking”, set “Method” to “Average stacking with rejection”, and “Normalisation” to “Additive with Scaling”, and leave “Recompute” and “Faster Normalisation” unchecked. Set “Pixel rejection” to “Winsorized Sigma Clipping" and set “Weighting” to “None”. Set “Sigma low” to 3.000 and “Sigma high” to 2.500. Leave “Create rejection maps” unselected set “Image rejection” to “all”. Under “Stacking result", leave “Output normalisation”, “RGB equalization" and “Force 32b output” unselected. Now, hit “Start stacking”.
When it finishes, you should be left with a darks_stacked.fit in the work folder you created. Now go back to “Sequence”, select flats_.seq, and stack in the same way you did for the darks.
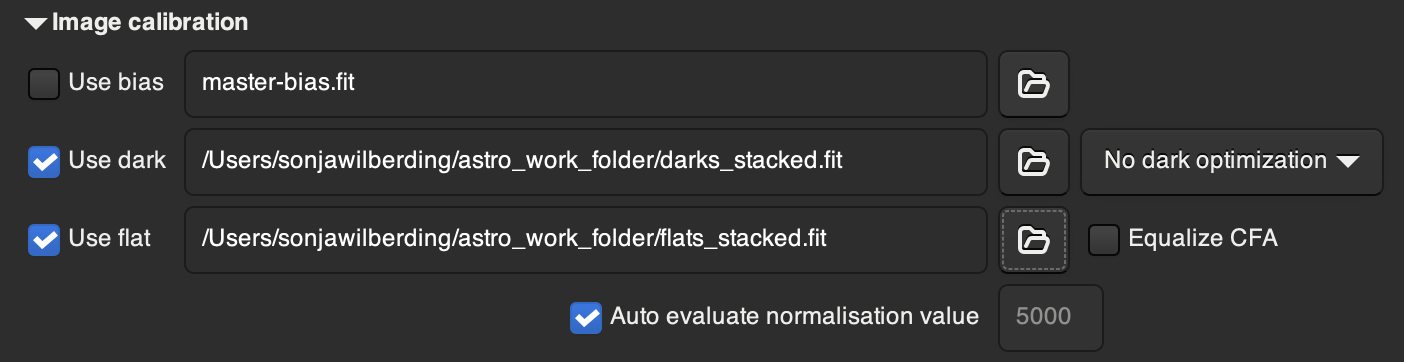
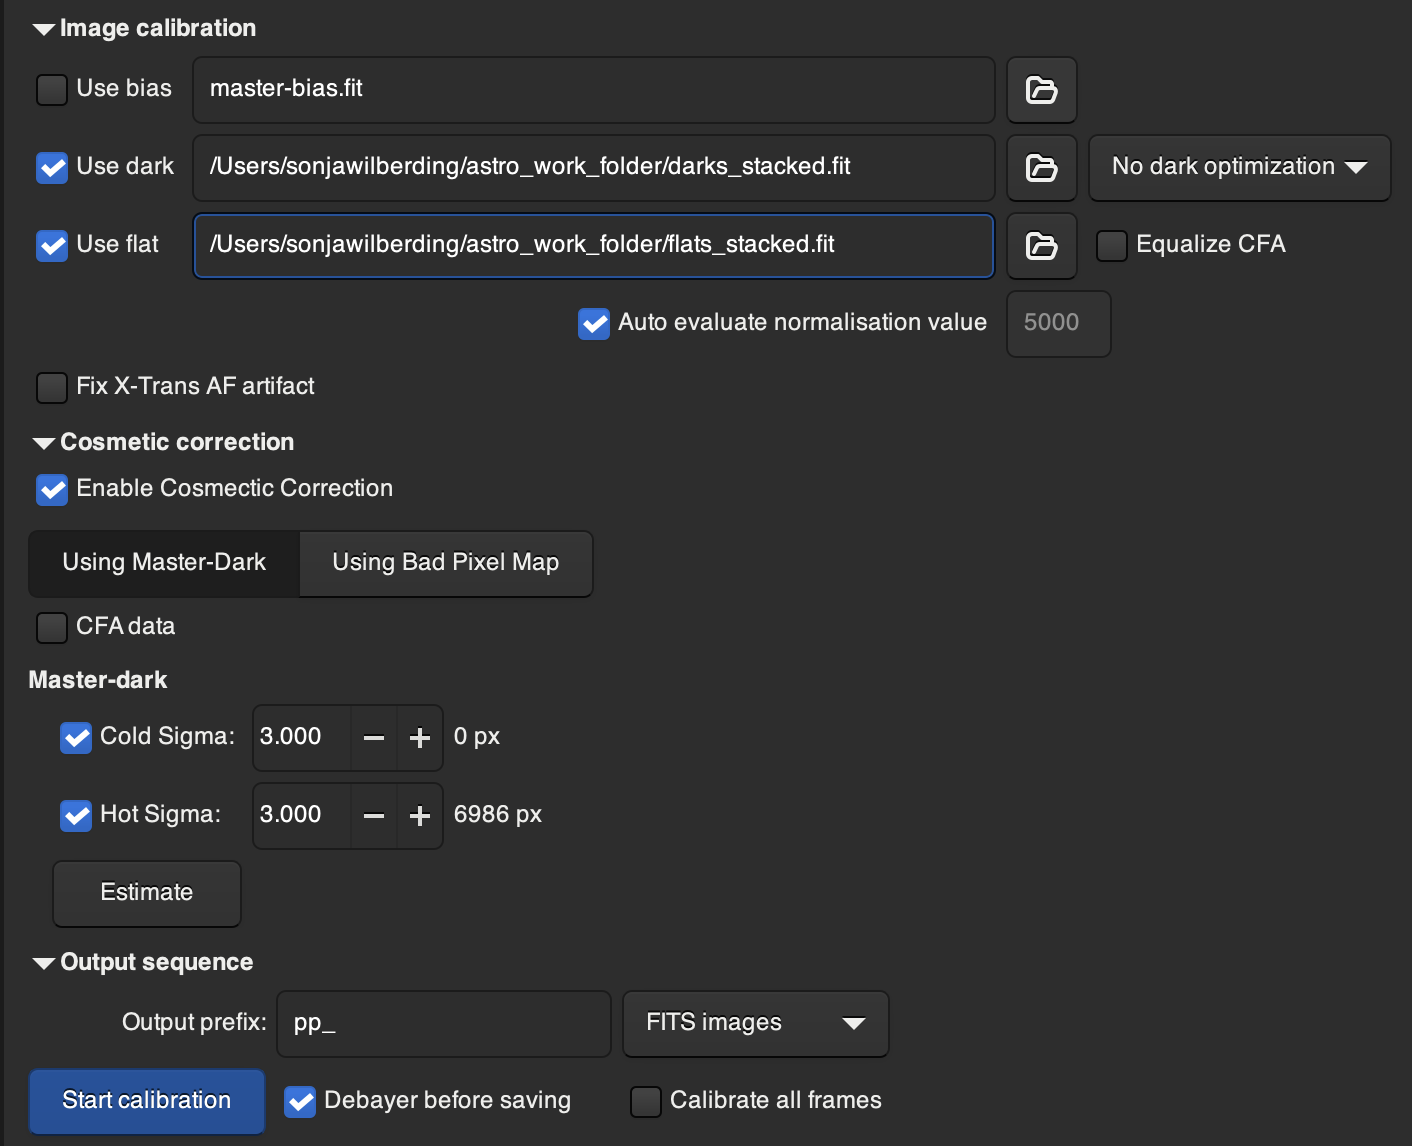
Now, it's time to finally sequence your lights. Note: you may want to break this up into a few different sub-sequences to save space (i.e, make a sequence of 300 lights, process and stack it, then all of the FITS images except for the final stacked photo, and rinse and repeat until you have only a few stacked photos that you can process and stack together into one master photo, essentially processing everything in chunks of 300 at a time). Sequence your lights in the same way you did the darks and flats, under the “Conversion” tab; name it the name of your target with an underscore and “lights”, such as “pleiades_lights”. Using this naming convention can help clear up confusion on multi-target shoots. Then, instead of the “Stacking” tab, navigate to the “Calibration” tab. Select the boxes for “Use dark” and “Use flat” (don’t select “Use bias”) and click the little folder icons next to them where you will be prompted to put in your master dark and flat images (these should be dark_stacked.fit and flat_stacked.fit). Leave “No dark optimization” as it is, leave “Equalize CFA” unselected, and leave “Auto evaluate normalisation value” selected.
Then, leave “Enable Cosmetic Correction” selected with “Using Master-Dark” and leave “CFA data” unselected. Under “Master-dark”, leave “Cold Sigma” and “Hot Sigma” selected with a value of 3.000 each. MAKE SURE “Debayer before saving” is selected and “Calibrate all frames” is unselected. Now hit “Start calibration”.
When it finishes, you should be left with a new sequence of lights prefixed with “pp_” e.g. “pp_pleiades_lights.seq”.
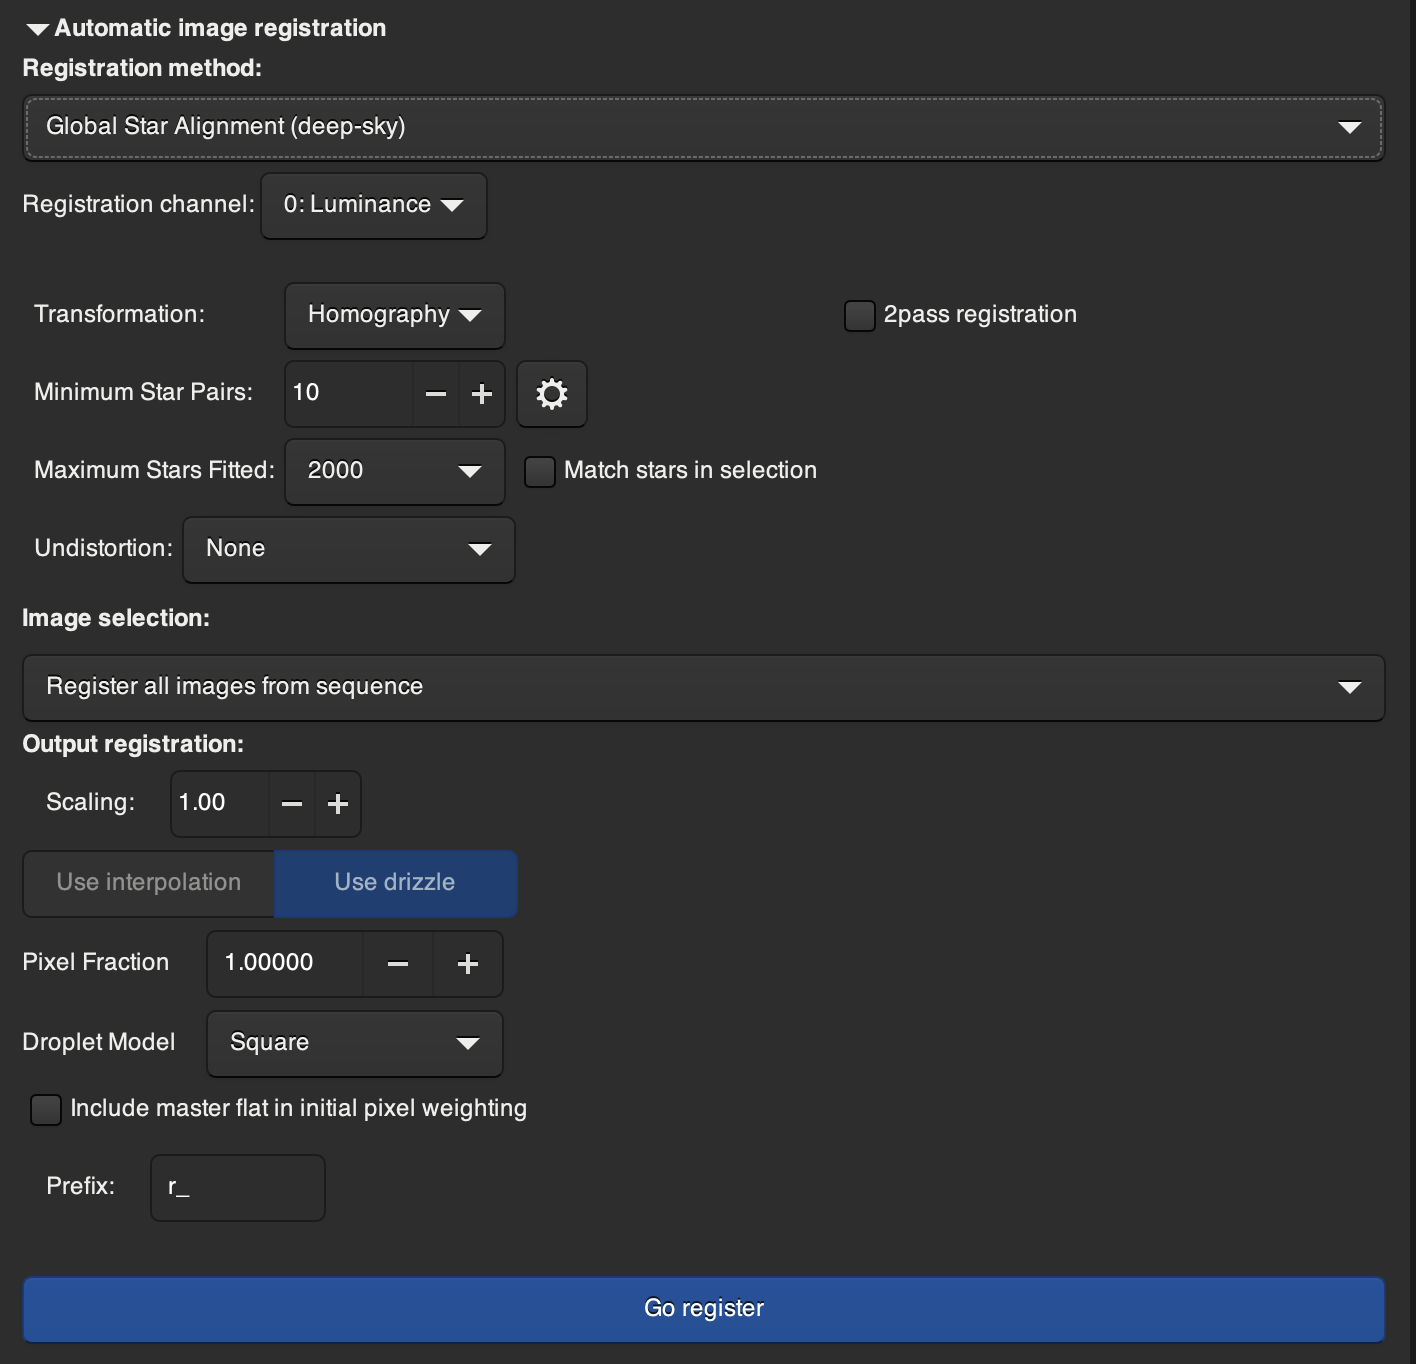
Make sure your calibrated sequence is selected in the “Sequence” tab and navigate now to the “Registration” tab. There are a lot of settings in this tab, but you should keep them all at their default. Just hit “Go register”. This will analyze each image and determine its position and orientation based on the relative star positions, so that when the sequence is stacked, everything will be right on top of each other. This part is quite resource intensive and slow, so be patient, make sure you have enough disk space and let it do its magic. If for some reason you need to check the default settings of the "Registration" tab, here they are:
When it’s finished, you should be left with a sequence something like “r_pp_ pleiades _lights.seq”.
Now, navigate to the stacking tab, and stack in the same way you stacked your flats and dark (At least 90% of the time. For very very faint objects, you may want to play with sum stacking or pixel maximum stacking). If using sub-sequences, you'll need to then take each of these final stacked images, and re-register and re-stack them together. But if just using one large sequence of lights, this stacked image will be your final image.
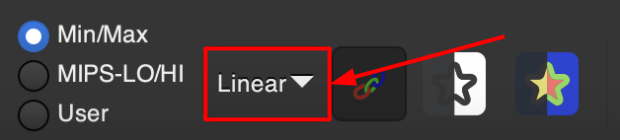
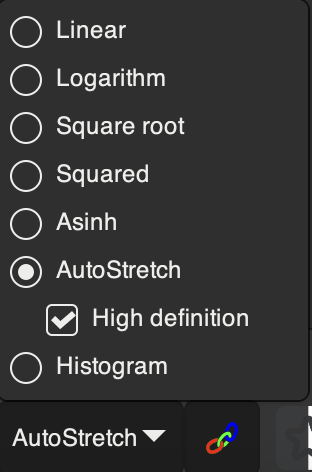
Your image may not look like very much currently, black with maybe some faint stars… and that’s okay! With stretching, we are going to take extremely faint miniscule detail, and bring it out into a bright and detailed image. First, make sure your final stacked image is pulled up in Siril. Then, look at the bottom bar where it says “Linear” and change it to “AutoStretch”. This is not your actual final stretch, but a “good enough” approximation that will allow you to see what you’re doing for the time being.
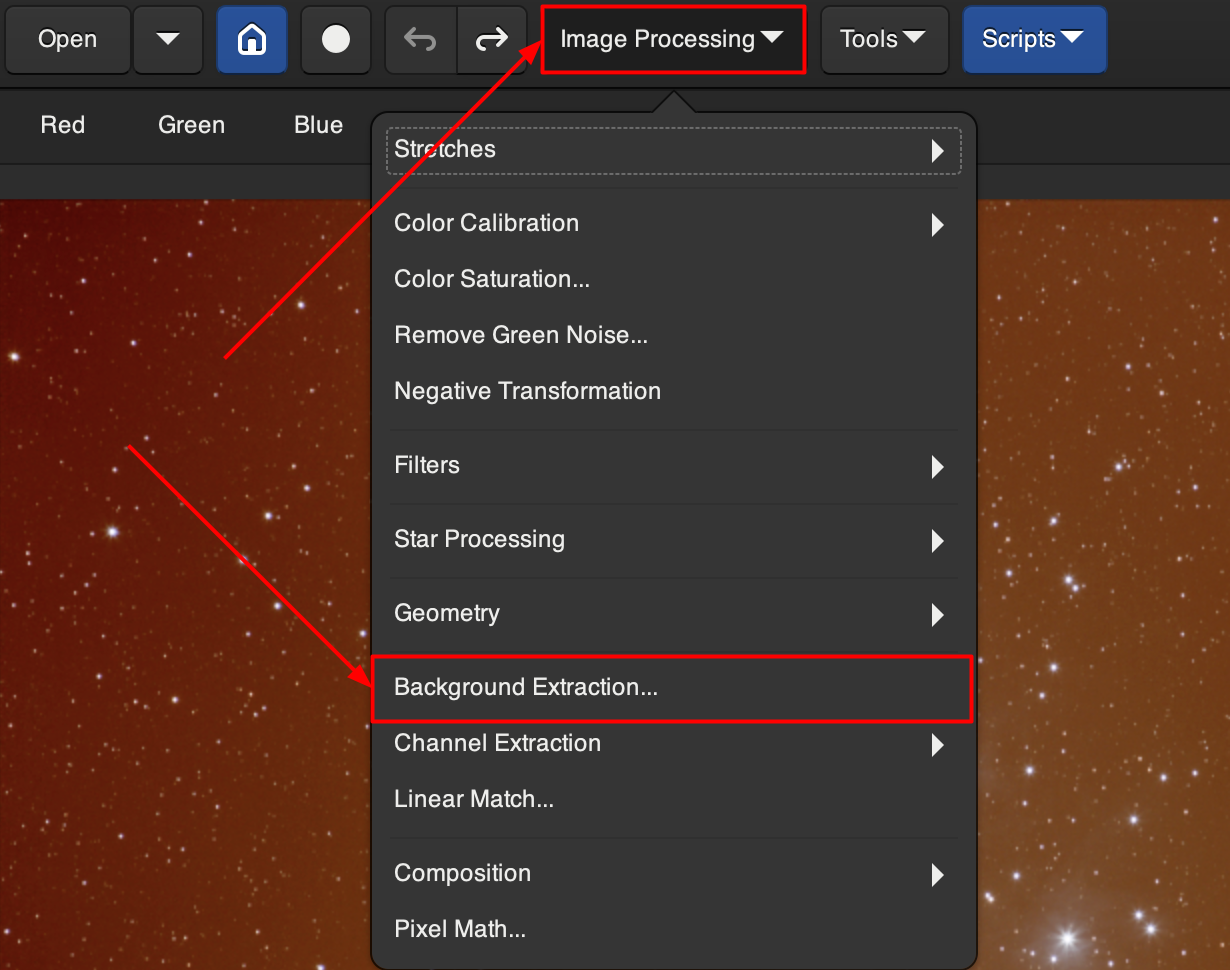
Now, go to the top bar, and select “Image Processing” and “Background Extraction.”
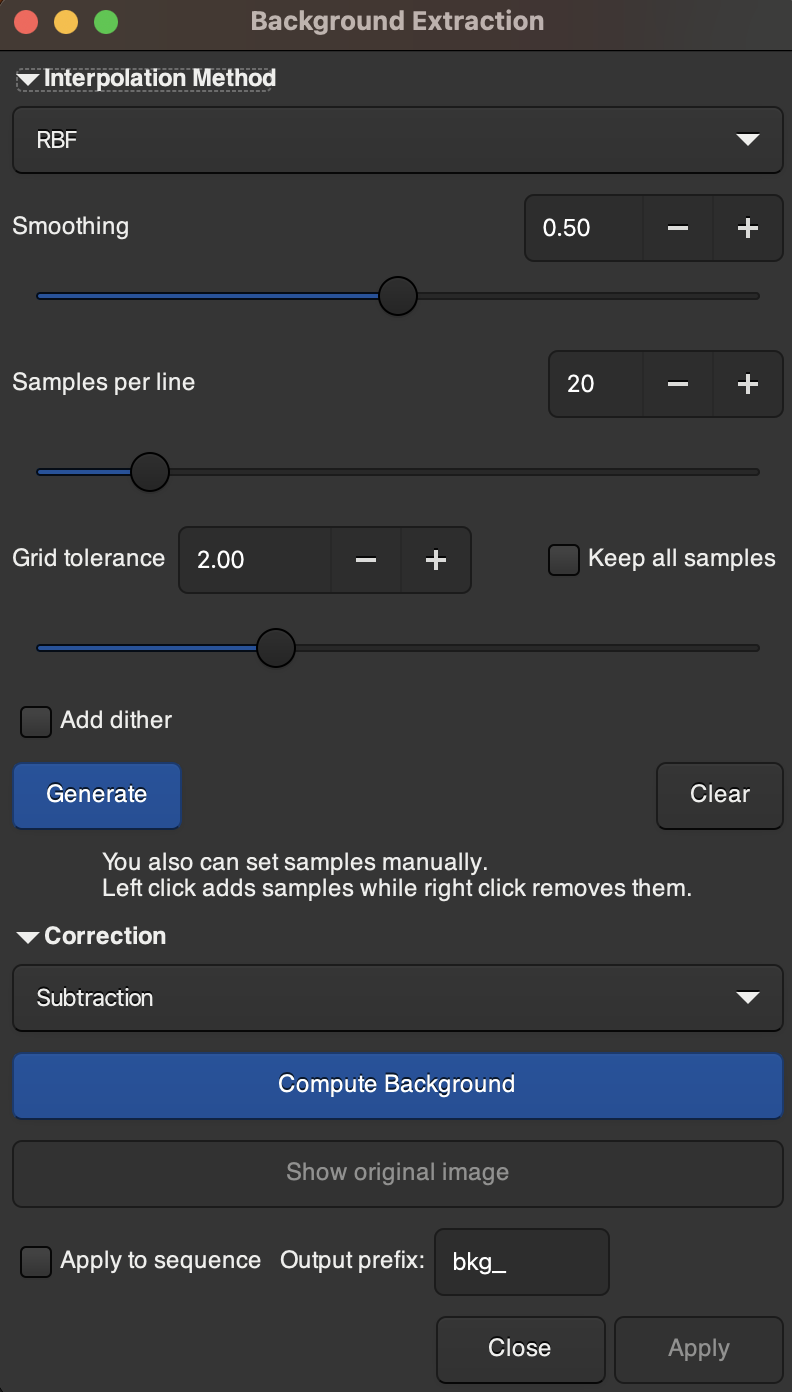
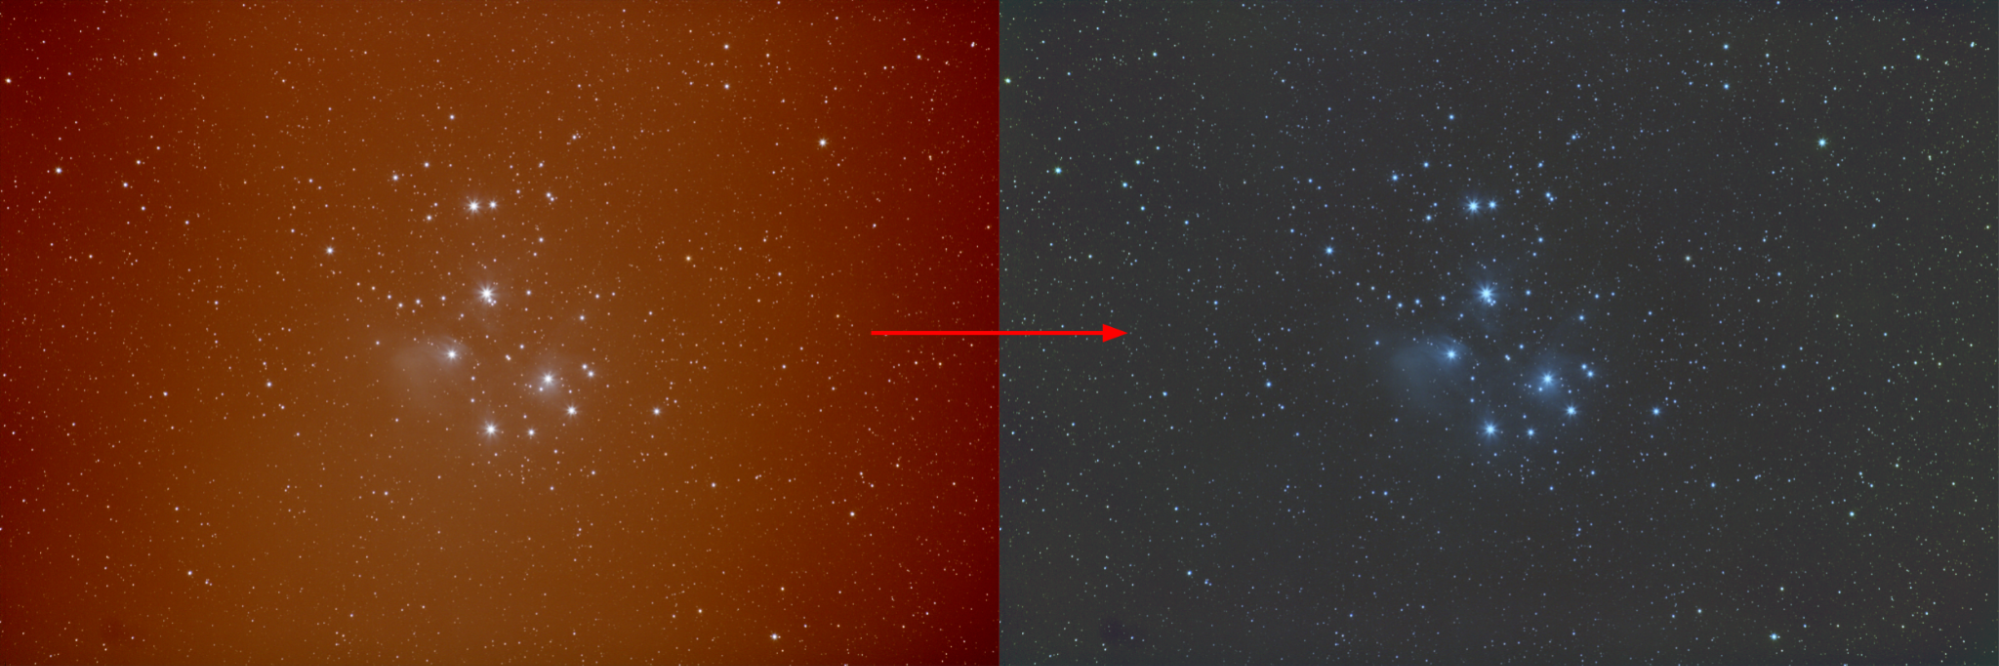
This will bring you to a pop up window. The default setting should work just fine. Hit “Generate” to automatically generate a bunch of background samples of your photo, and then hit “Compute Background”. You should see any color noise or imbalance in the background of your photo disappear, making it crisper. Hit “Apply” to save the changes.
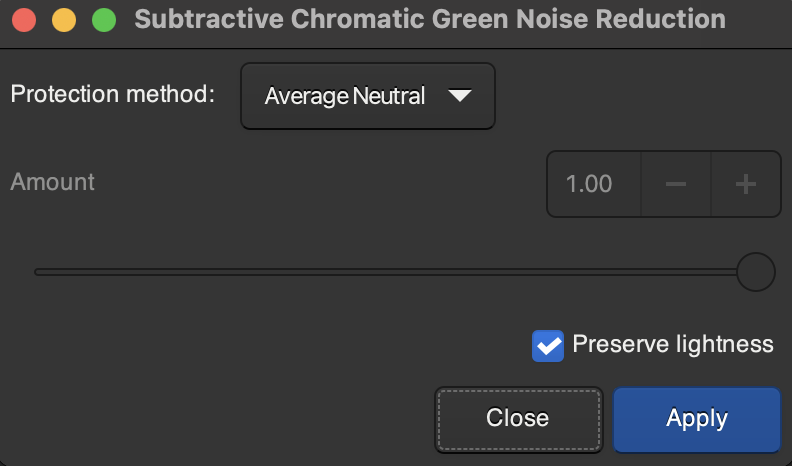
You may notice that there is still a bit of a noisy ugly green sheen to your background. This is normal and to be expected. To remove it, go back to “Image Processing” and select “Remove Green Noise…”. Keep the default settings and apply.
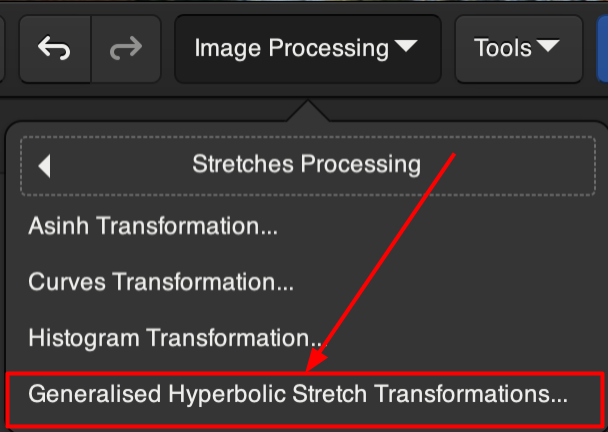
Now, it’s time to properly stretch our photo. Switch the photo back to “Linear” from “AutoStretch”. Then, navigate back up to that top “Image Processing” bar and select “Stretches”. Then, select “Generalised Hyperbolic Stretch Transformations…”.
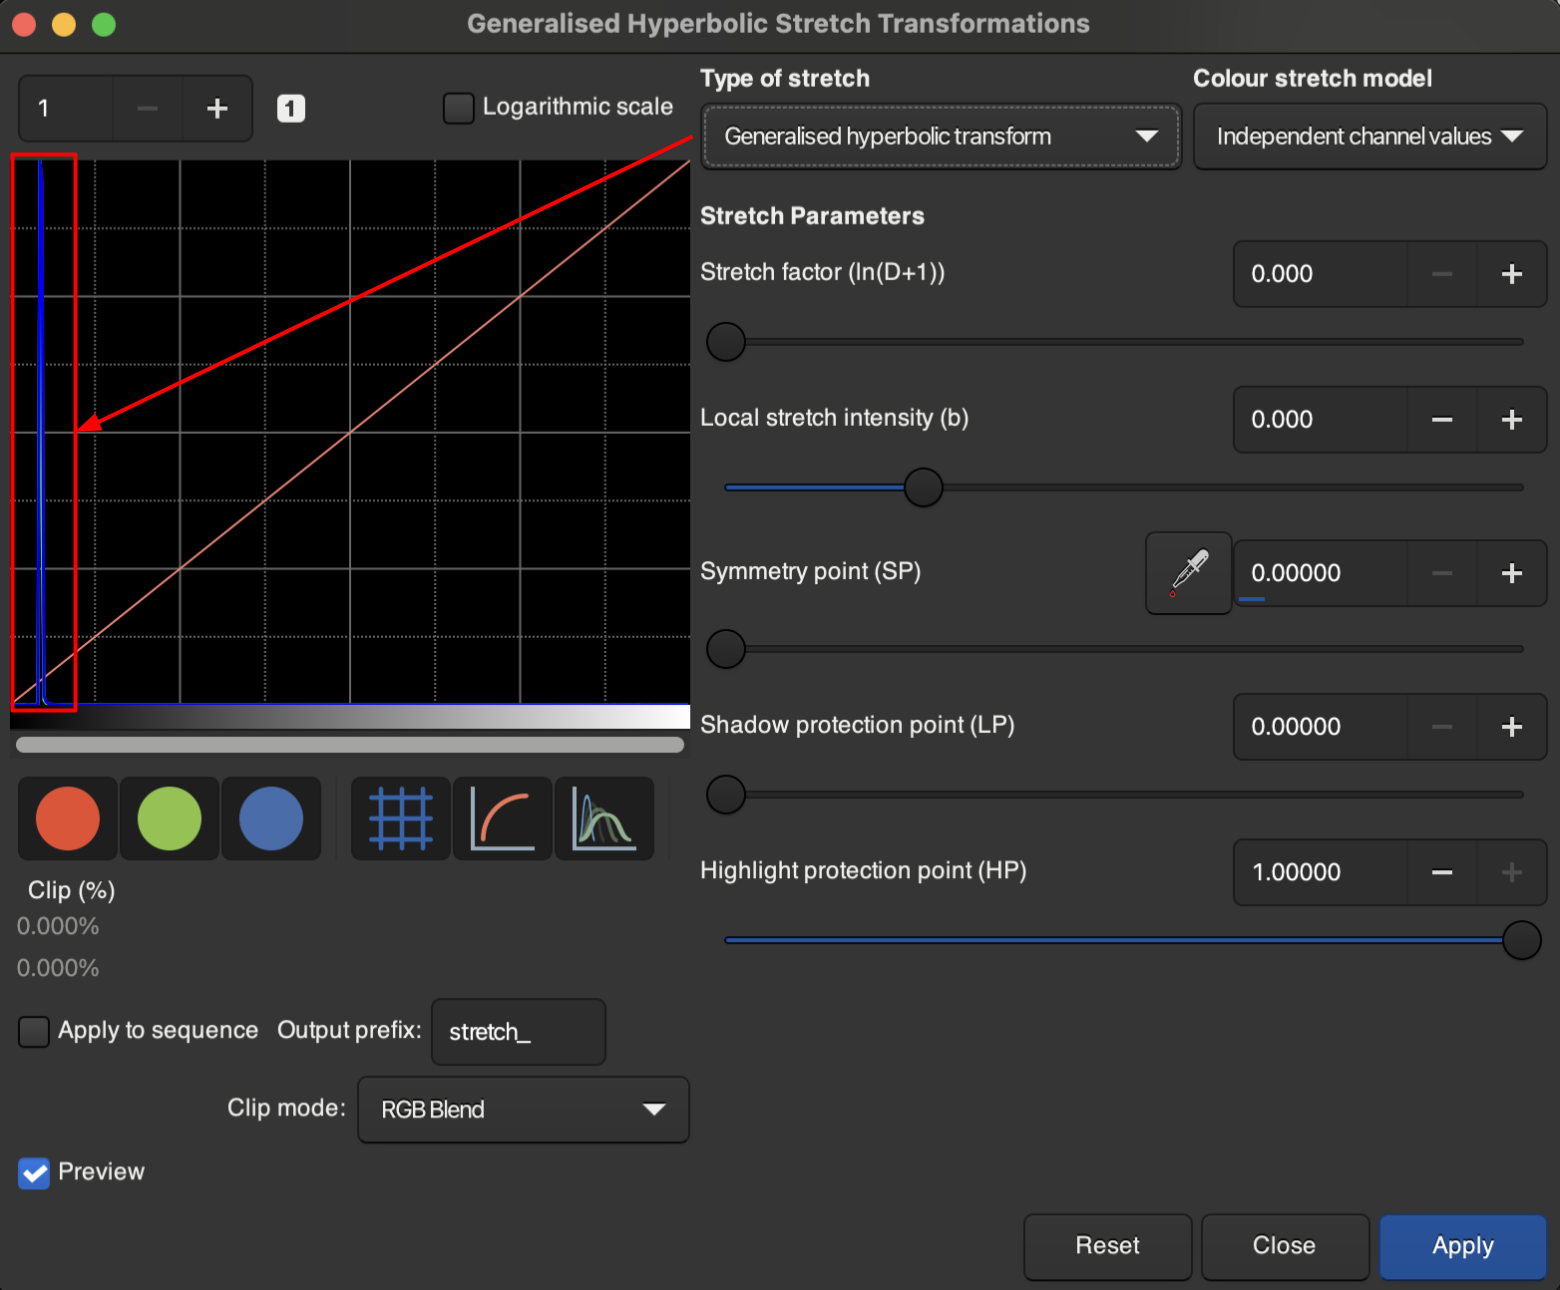
Now, you’re going to be brought to a new window. Notice that under “Type of stretch” there are a few kinds of stretch. We will be using the “Generalised hyperbolic transform” to actually bring out our detail, and the “Linear stretch (BP shift)” to avoid murkiness in the background. Stay on “Generalised hyperbolic transform” for now. If you take a look at the histogram on the panel, you'll notice that all of your data is concentrated in a tiny dark band towards the left. Your job is to stretch that narrow little band wider and wider so that more detail can be brought out, but without blowing out the highlights and background.
To actually accomplish this, tweak the symmetry point and increase the stretch factor until faint detail starts to appear and the background starts to wash a little bit. Hit “Apply”.
Now, switch to “Linear stretch (BP shift)”, and adjust the Black Point until the background is not quite so murky and grey. Be careful when doing this, it is a destructive process. You want a high enough Black Point to where the background is crisp again, but not so much that you’re destroying faint detail that can be further pulled out. Once your image looks clear again, hit “Apply” and go back to “Generalised hyperbolic transform”. Rinse and repeat until you can’t pull out any more detail without just making the image brighter and more blown out overall, and your histogram shows a wide hump towards the left side.
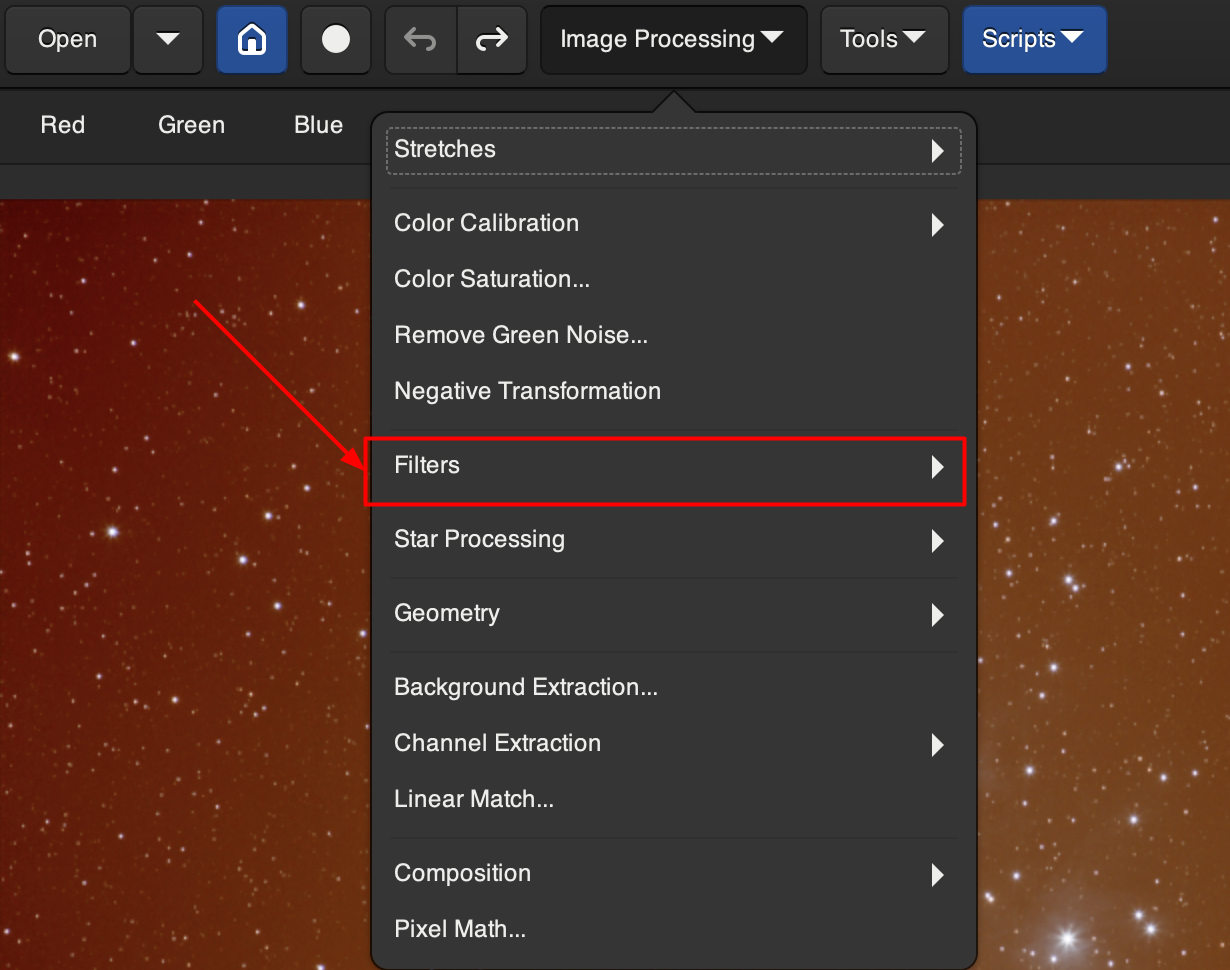
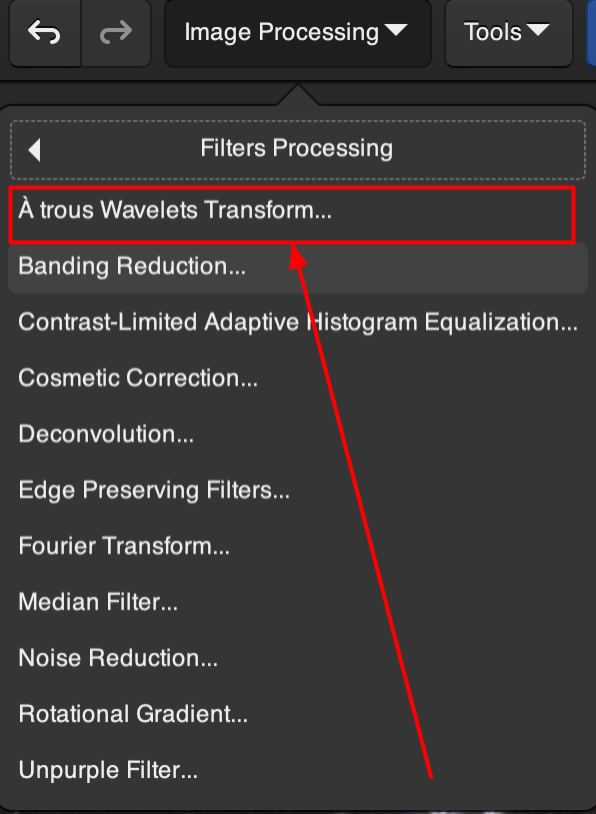
One final step before we export our image from Siril: Go back up to “Image Processing”, select “Filters” and select “À Trous Wavelets Transform”.
This will essentially calculate different levels of “detail” within your image. By blurring extremely fine detail, we can reduce unnecessary noise while keeping the larger detail of the image.
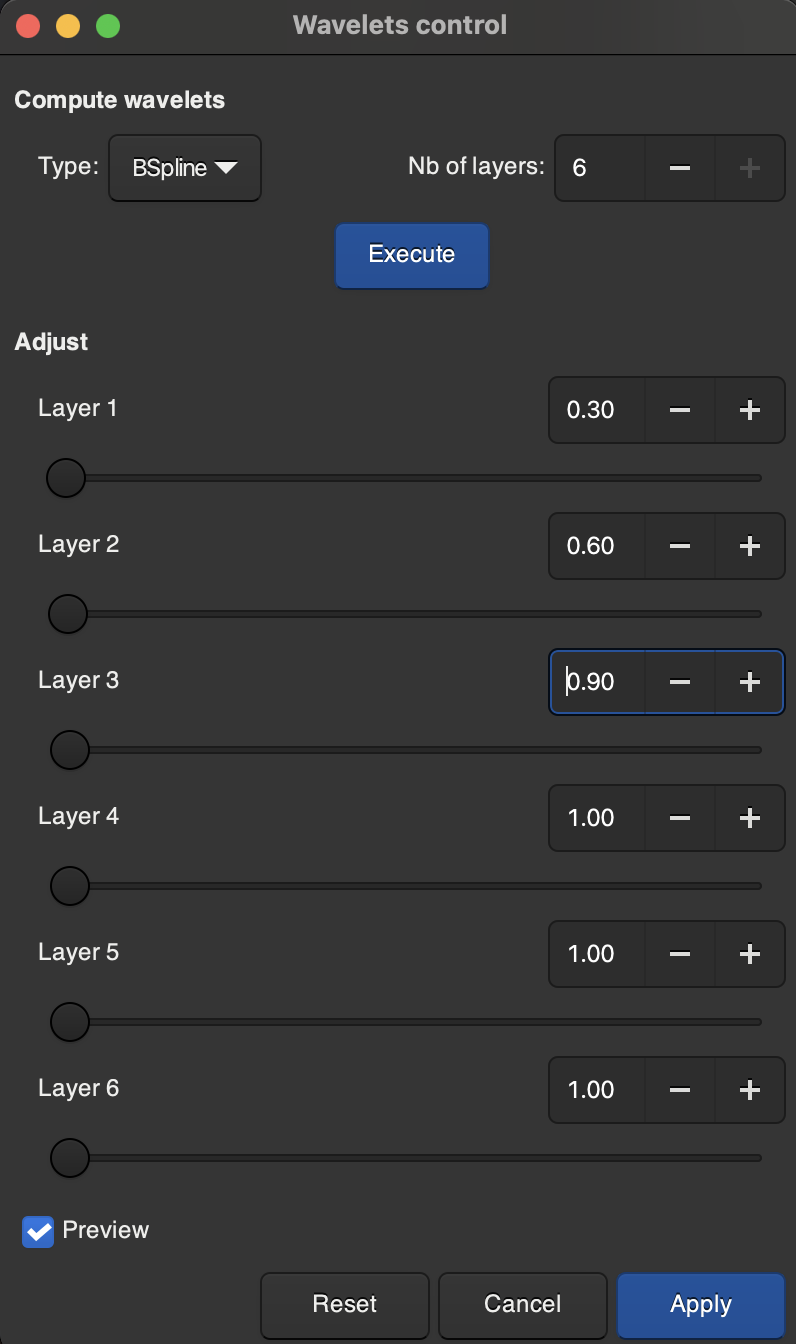
You will be brought to another pop up window. With “Type” set to “BSpline” and “Nb of layers” set to 6, hit “Execute”. You will see a series of six layers. Do not edit layers 4-6. For Layer 1, set the value to 0.3, for Layer 2 set it to 0.6, and for Layer 3 set it to 0.9. Hit “Apply”.
You should notice the background of your photo is a little less grainy and a little smoother now.
To export your processed image, navigate to the download icon in the top right of Siril.
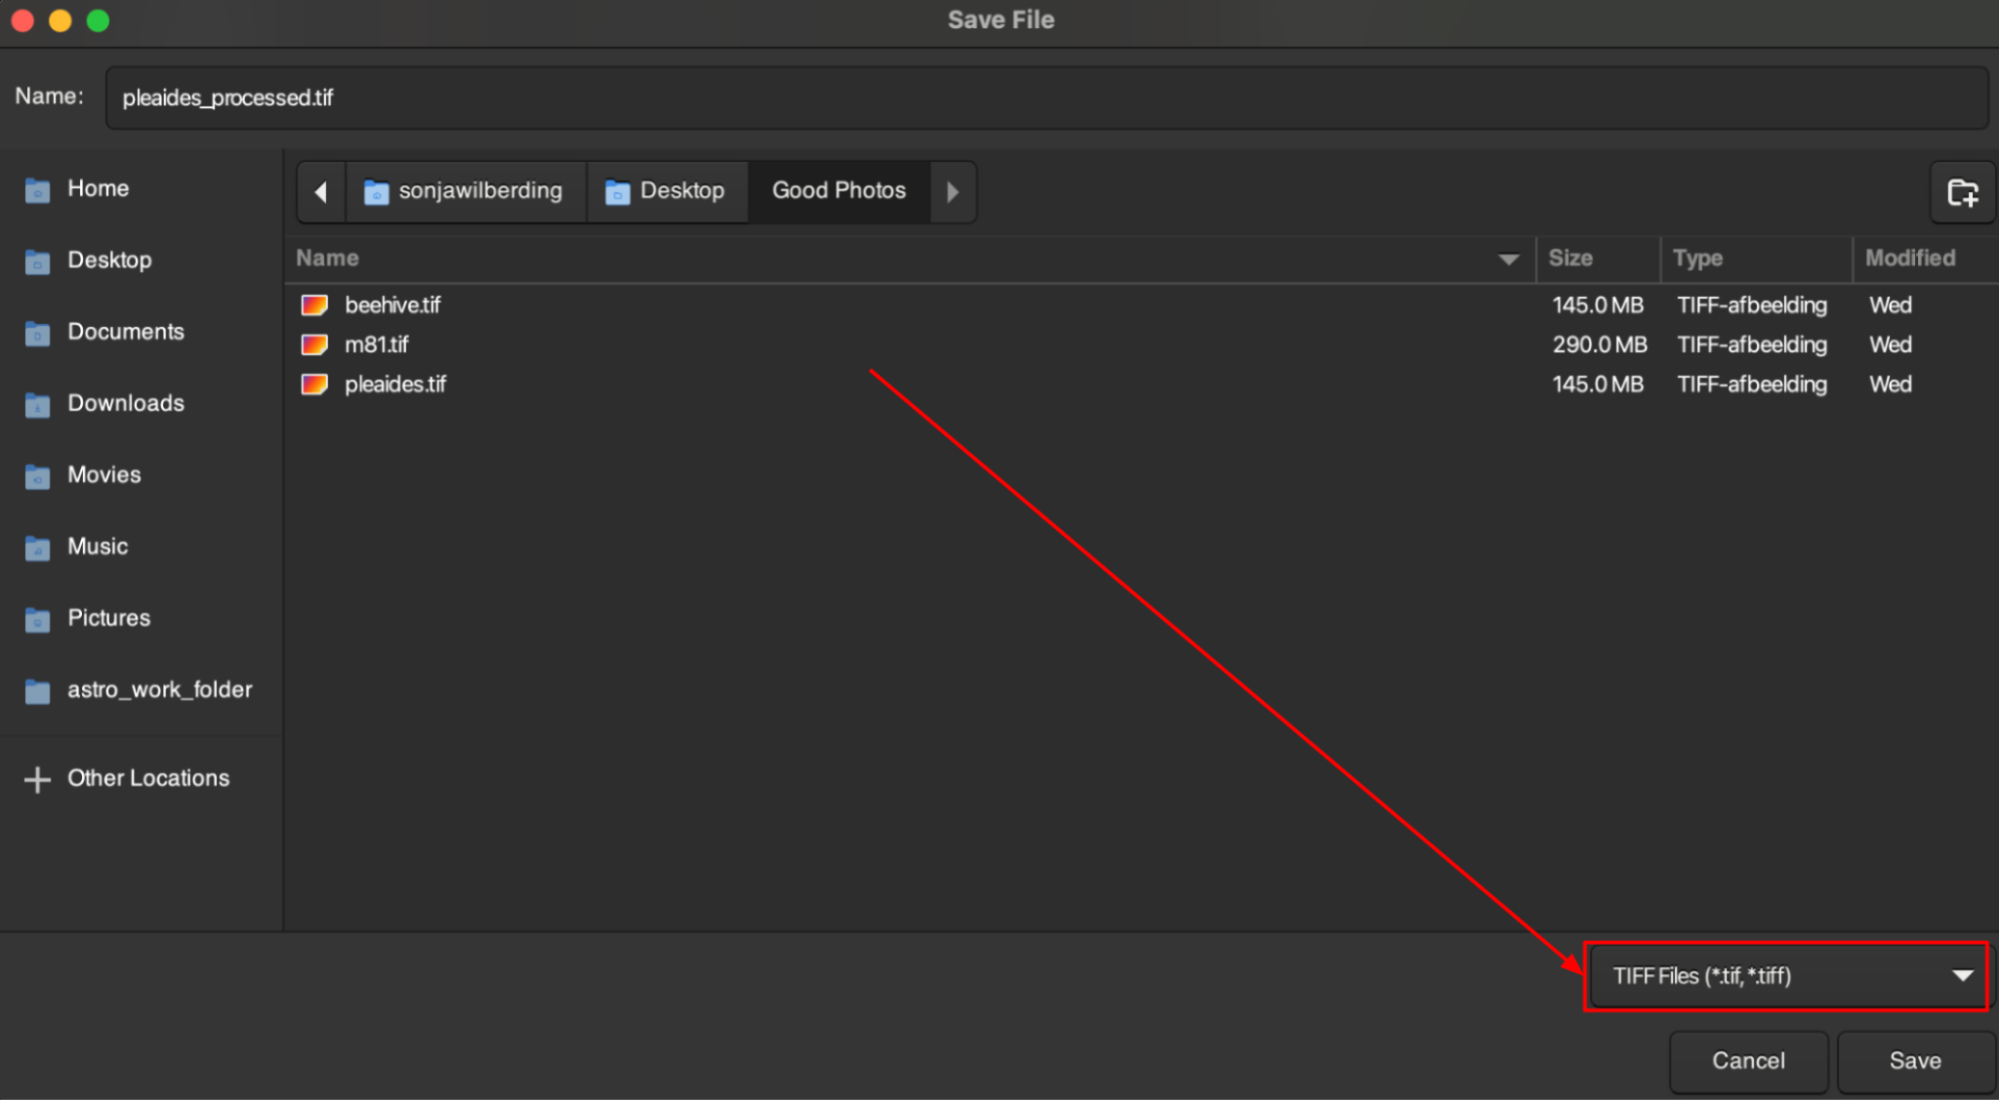
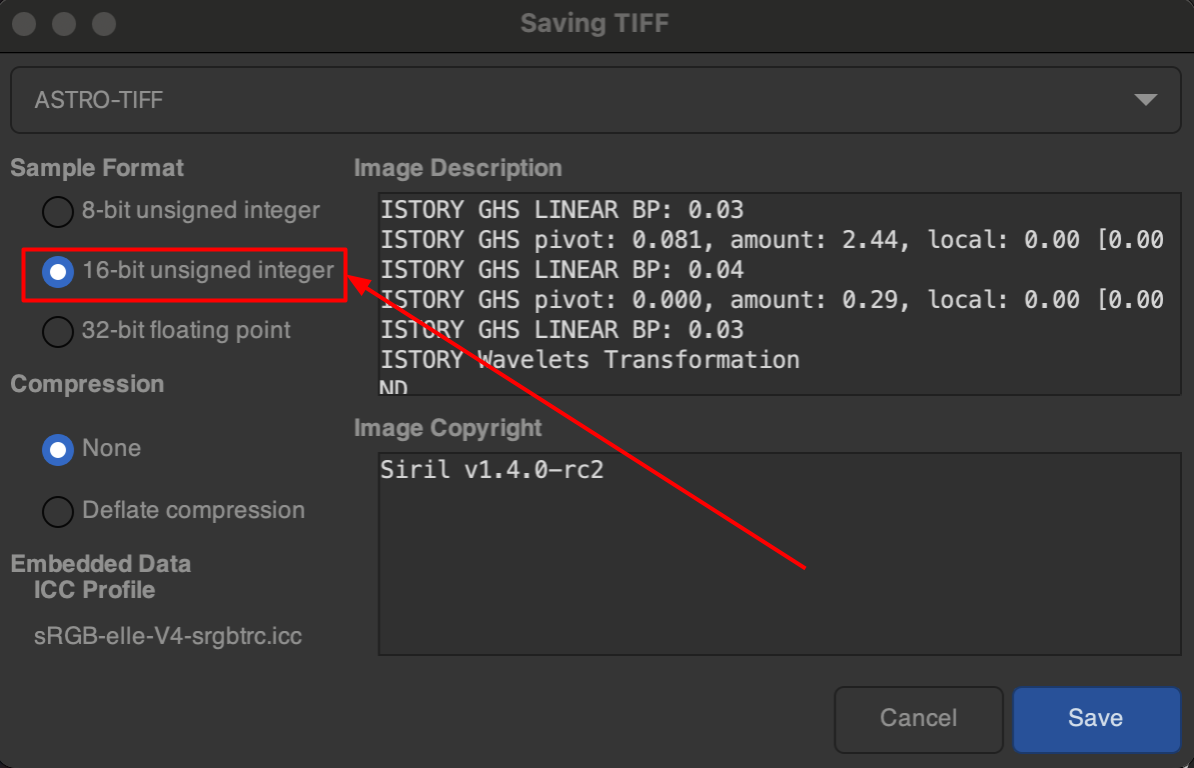
You will then be prompted to select a location, name, and format for the exported file. Make sure the format is set to “TIFF files” and then hit “Save”.
You will be prompted again for how to save the TIFF. Make sure the sample format is set to “16-bit unsigned integer” and the compression is set to “None”. Then, hit “Save”.
I would advise you to export your final TIFF somewhere besides your working folder, so that you can nuke your working folder afterwards to recover all of your disk space.
By this point, you should (hopefully) already have a pretty good looking image. You just need to put some finishing touches on. To do this, you’re going to use a non-destructive photo editor. I personally use Adobe Lightroom Classic, because I get it for free with my university. If you have access to Lightroom for free for any reason as well, just go ahead and use that. If not, seeing as this is the Broke Dumbass Guide to Astrophotography, Darktable is a good open-source alternative.
No matter your editor of choice, there is no real single approach to post-processing. Tweak things like temperature, tint, contrast, highlights, exposure, and black/white point. What you should almost always do is bump up the color saturation in your image and color grade your image to your liking. For galaxies, I find cooler/bluish shadows and warmer/orangeish highlights look well, but really, the color grading should accent the colors already present in your object. For the Orion Nebula, I find indigo shadows and pinkish highlights look quite nice.
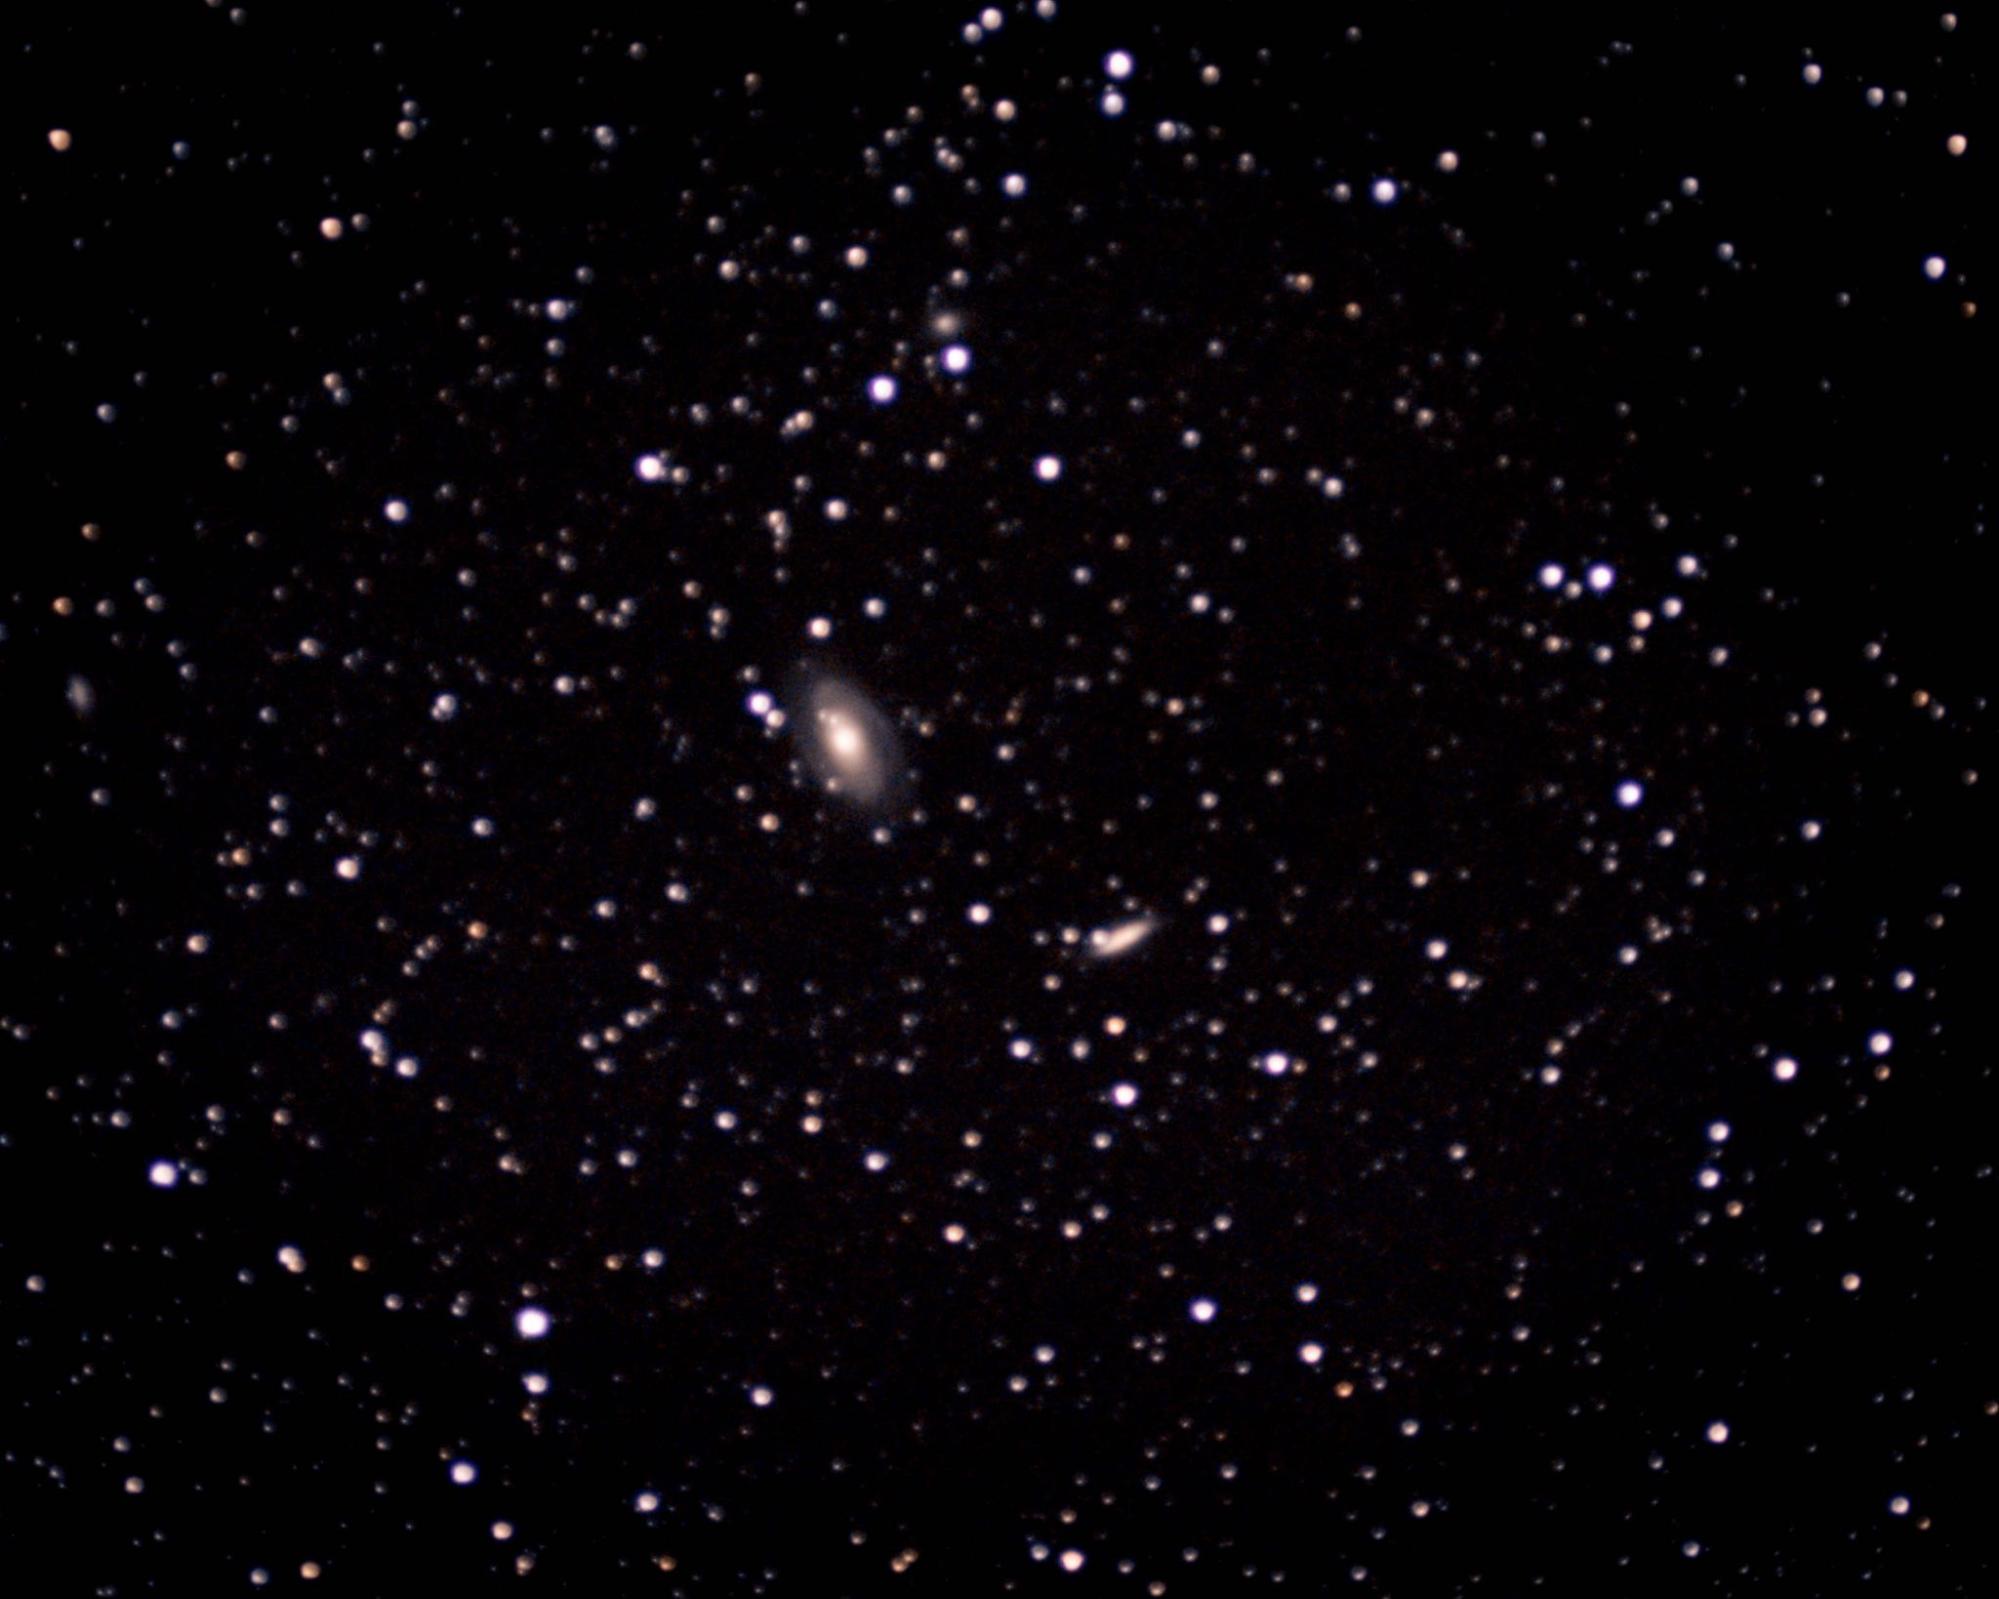
With the basic methods outlined in this guide, you should be able to take very solid astrophotos of bright deep-sky targets. If you’re willing to take even more subexposures, you can use these same principles to bring out even fainter objects that the targets I laid out, like this image I took of the twin Bode’s and Cigar Galaxies (M81 and M82).
Or, if you’re willing to get a wide-angle lens as well, you can take amazing wide exposures, like this one I took of the Milky Way (the bright “star” towards the top is actually Jupiter).
Whatever you decide to capture, I hope this guide helps you reveal detailed wonders usually invisible to your naked eye. So now that you’ve finished this thing, grab your camera, get outside, and go look up at the stars. Happy stacking!